Keep the lesson moving
Pause or resume X-Plane, reposition the aircraft, change weather and time, introduce failures, adjust fuel and aircraft loading, tune radios and manage training traffic.
 INSTRUCTOR STATION / CUSTOMER PORTAL
MOBILE INSTRUCTOR STATION FOR X-PLANE 12
Change the scenario without interrupting the student.
Bring exercise setup, live flight monitoring and simulator control together in one touchscreen-friendly instructor interface.
Use the browser on the simulator PC, or pair your phone, tablet or laptop on the same trusted Wi-Fi network. No separate mobile app download is required.
For X-Plane 12. First-year commercial licence included with every FliteSim.com Commercial System purchase.
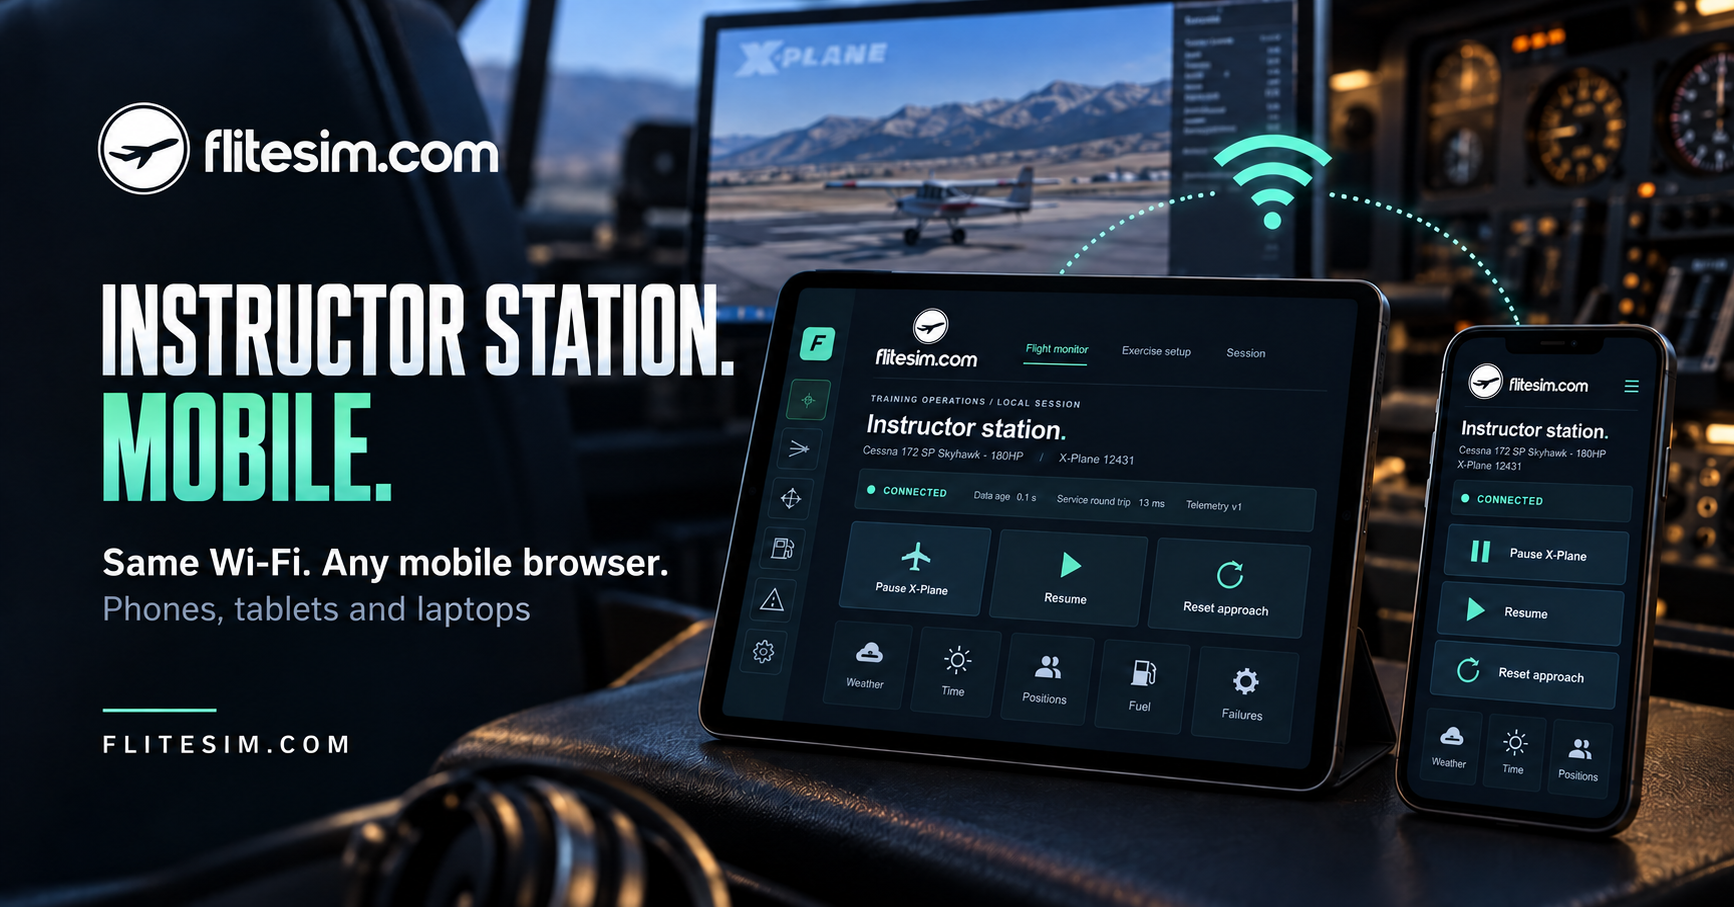
LESS TIME AT THE DESK. MORE TIME INSTRUCTING.
Use an iPhone, iPad, Android device or laptop with a compatible browser. Monitor the live flight and operate supported controls while the simulator PC keeps running X-Plane.
Pause or resume X-Plane, reposition the aircraft, change weather and time, introduce failures, adjust fuel and aircraft loading, tune radios and manage training traffic.
Multiple paired devices can monitor the session. Select Take control on the device you want to operate. The active controller is visible, and paired devices can be managed from the host dashboard.
Your device connects to the simulator PC over your trusted private network. No router port forwarding or public internet exposure is needed. Available controls depend on the aircraft and adapter capabilities.
Start Instructor Station on the Windows PC running X-Plane 12.
Connect your phone, tablet or laptop to the same Wi-Fi. Open the access URL shown in the station’s Admin Settings.
Enter the six-digit pairing code and name your device. Select Take control when you are ready to operate the session.
Use the local address displayed by your station to connect to the simulator. This website provides customer accounts and downloads.
THE COMPLETE INSTRUCTOR WORKSPACE
FliteSim Instructor Station helps instructors spend less time navigating simulator menus and more time observing, teaching and adapting the lesson. Reposition the aircraft, change the weather, introduce failures, monitor instruments and flight controls, manage circuit traffic, and review the session from a browser on the simulator PC.
From a student’s first circuit to a demanding instrument approach, the information and controls you need remain within easy reach. Saved positions, weather favourites, traffic configurations and dashboard layouts make recurring lessons faster to prepare and easier to repeat consistently.
SIMULATOR STARTUP
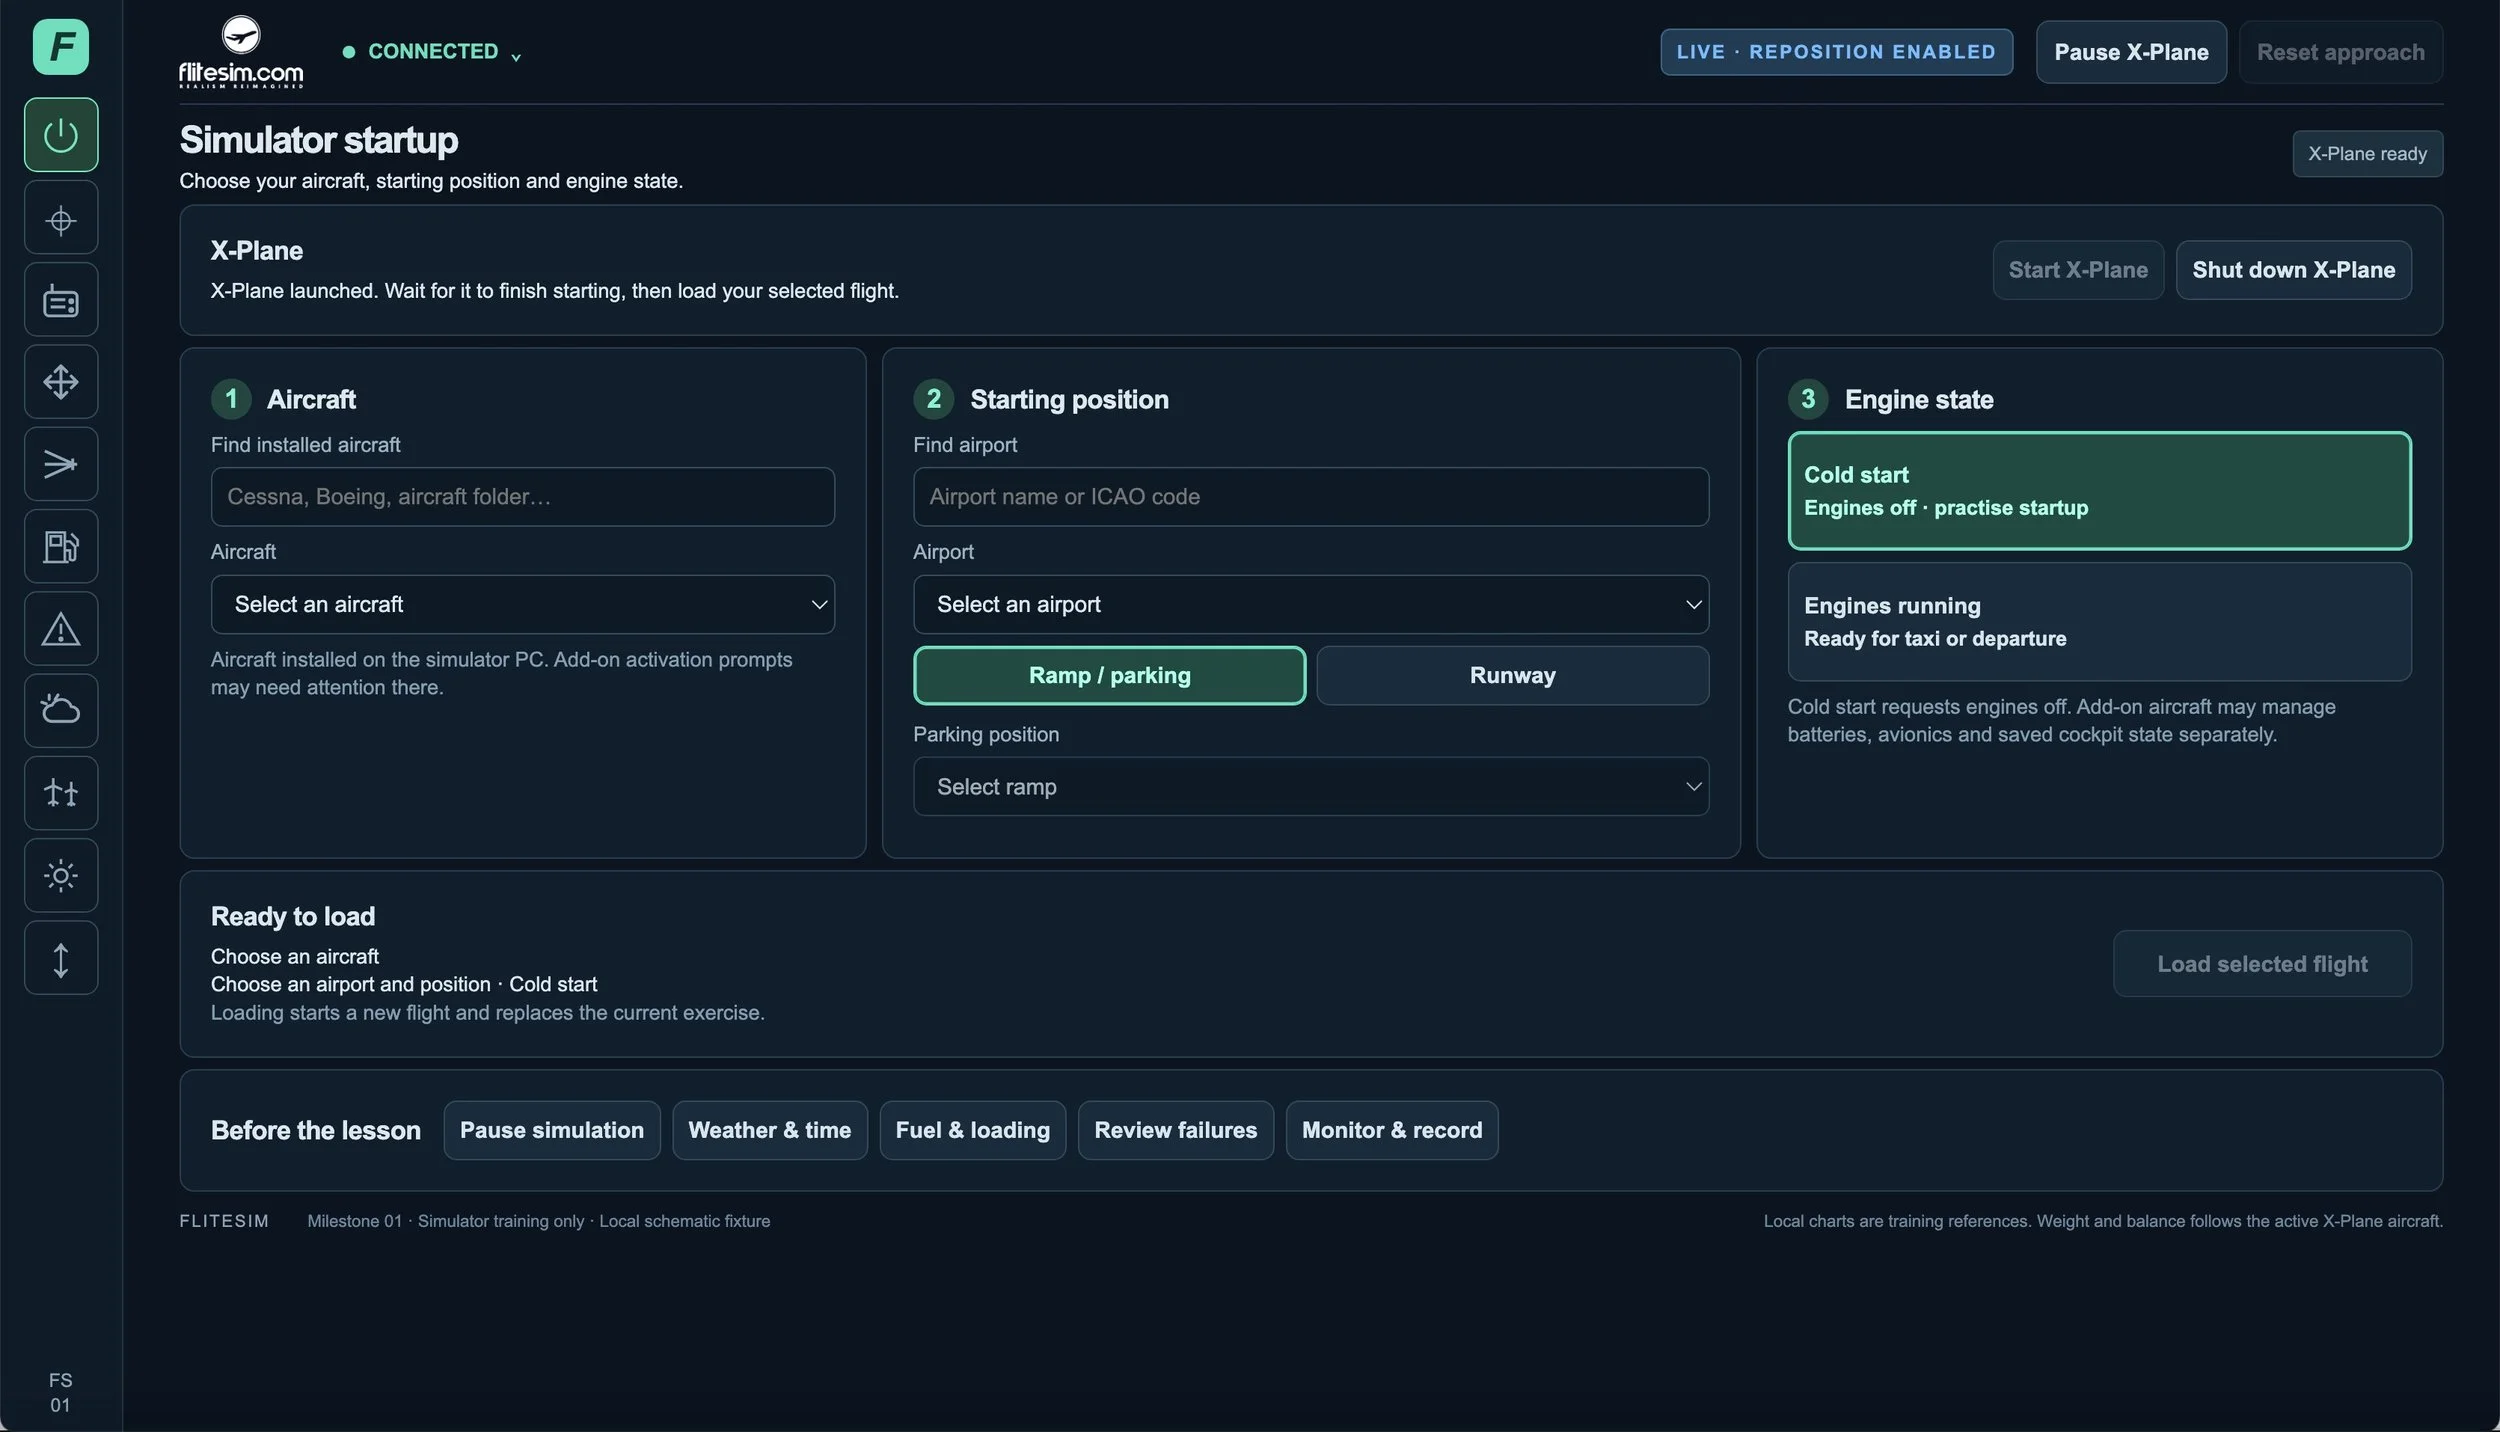
The Simulator Startup panel brings the essential session-preparation controls into one workspace, helping the instructor choose the aircraft, starting location and engine state before a lesson begins.
Start X-Plane from the Instructor Station when the simulator is configured and stopped. Clear status indications show whether X-Plane is stopped, running, ready for flight setup or processing a request. The instructor can also request a simulator shutdown while keeping the Instructor Station open.
Prepare the flight through three straightforward selections. Find an aircraft installed on the simulator PC, search for an airport by name or ICAO code, then choose an available ramp or parking position, or a departure runway. Starting locations come from the installed simulator scenery.
Choose Cold start to request engines off for startup practice, or Engines running to prepare for taxi or departure. Cold start controls the requested engine state; add-on aircraft may manage batteries, avionics and saved cockpit configurations separately.
Review the aircraft, airport, starting position and engine state in the Ready to load summary before selecting Load selected flight. A confirmation step makes clear that loading replaces the current exercise. Simulator shutdown also requires confirmation.
Use the Before the lesson shortcuts to pause or resume the simulation, open weather controls, adjust fuel and loading, review failures, or move to monitoring and recording. The compact layout keeps the preparation workflow visible without page scrolling on supported desktop layouts.
MAIN INSTRUCTOR DASHBOARD
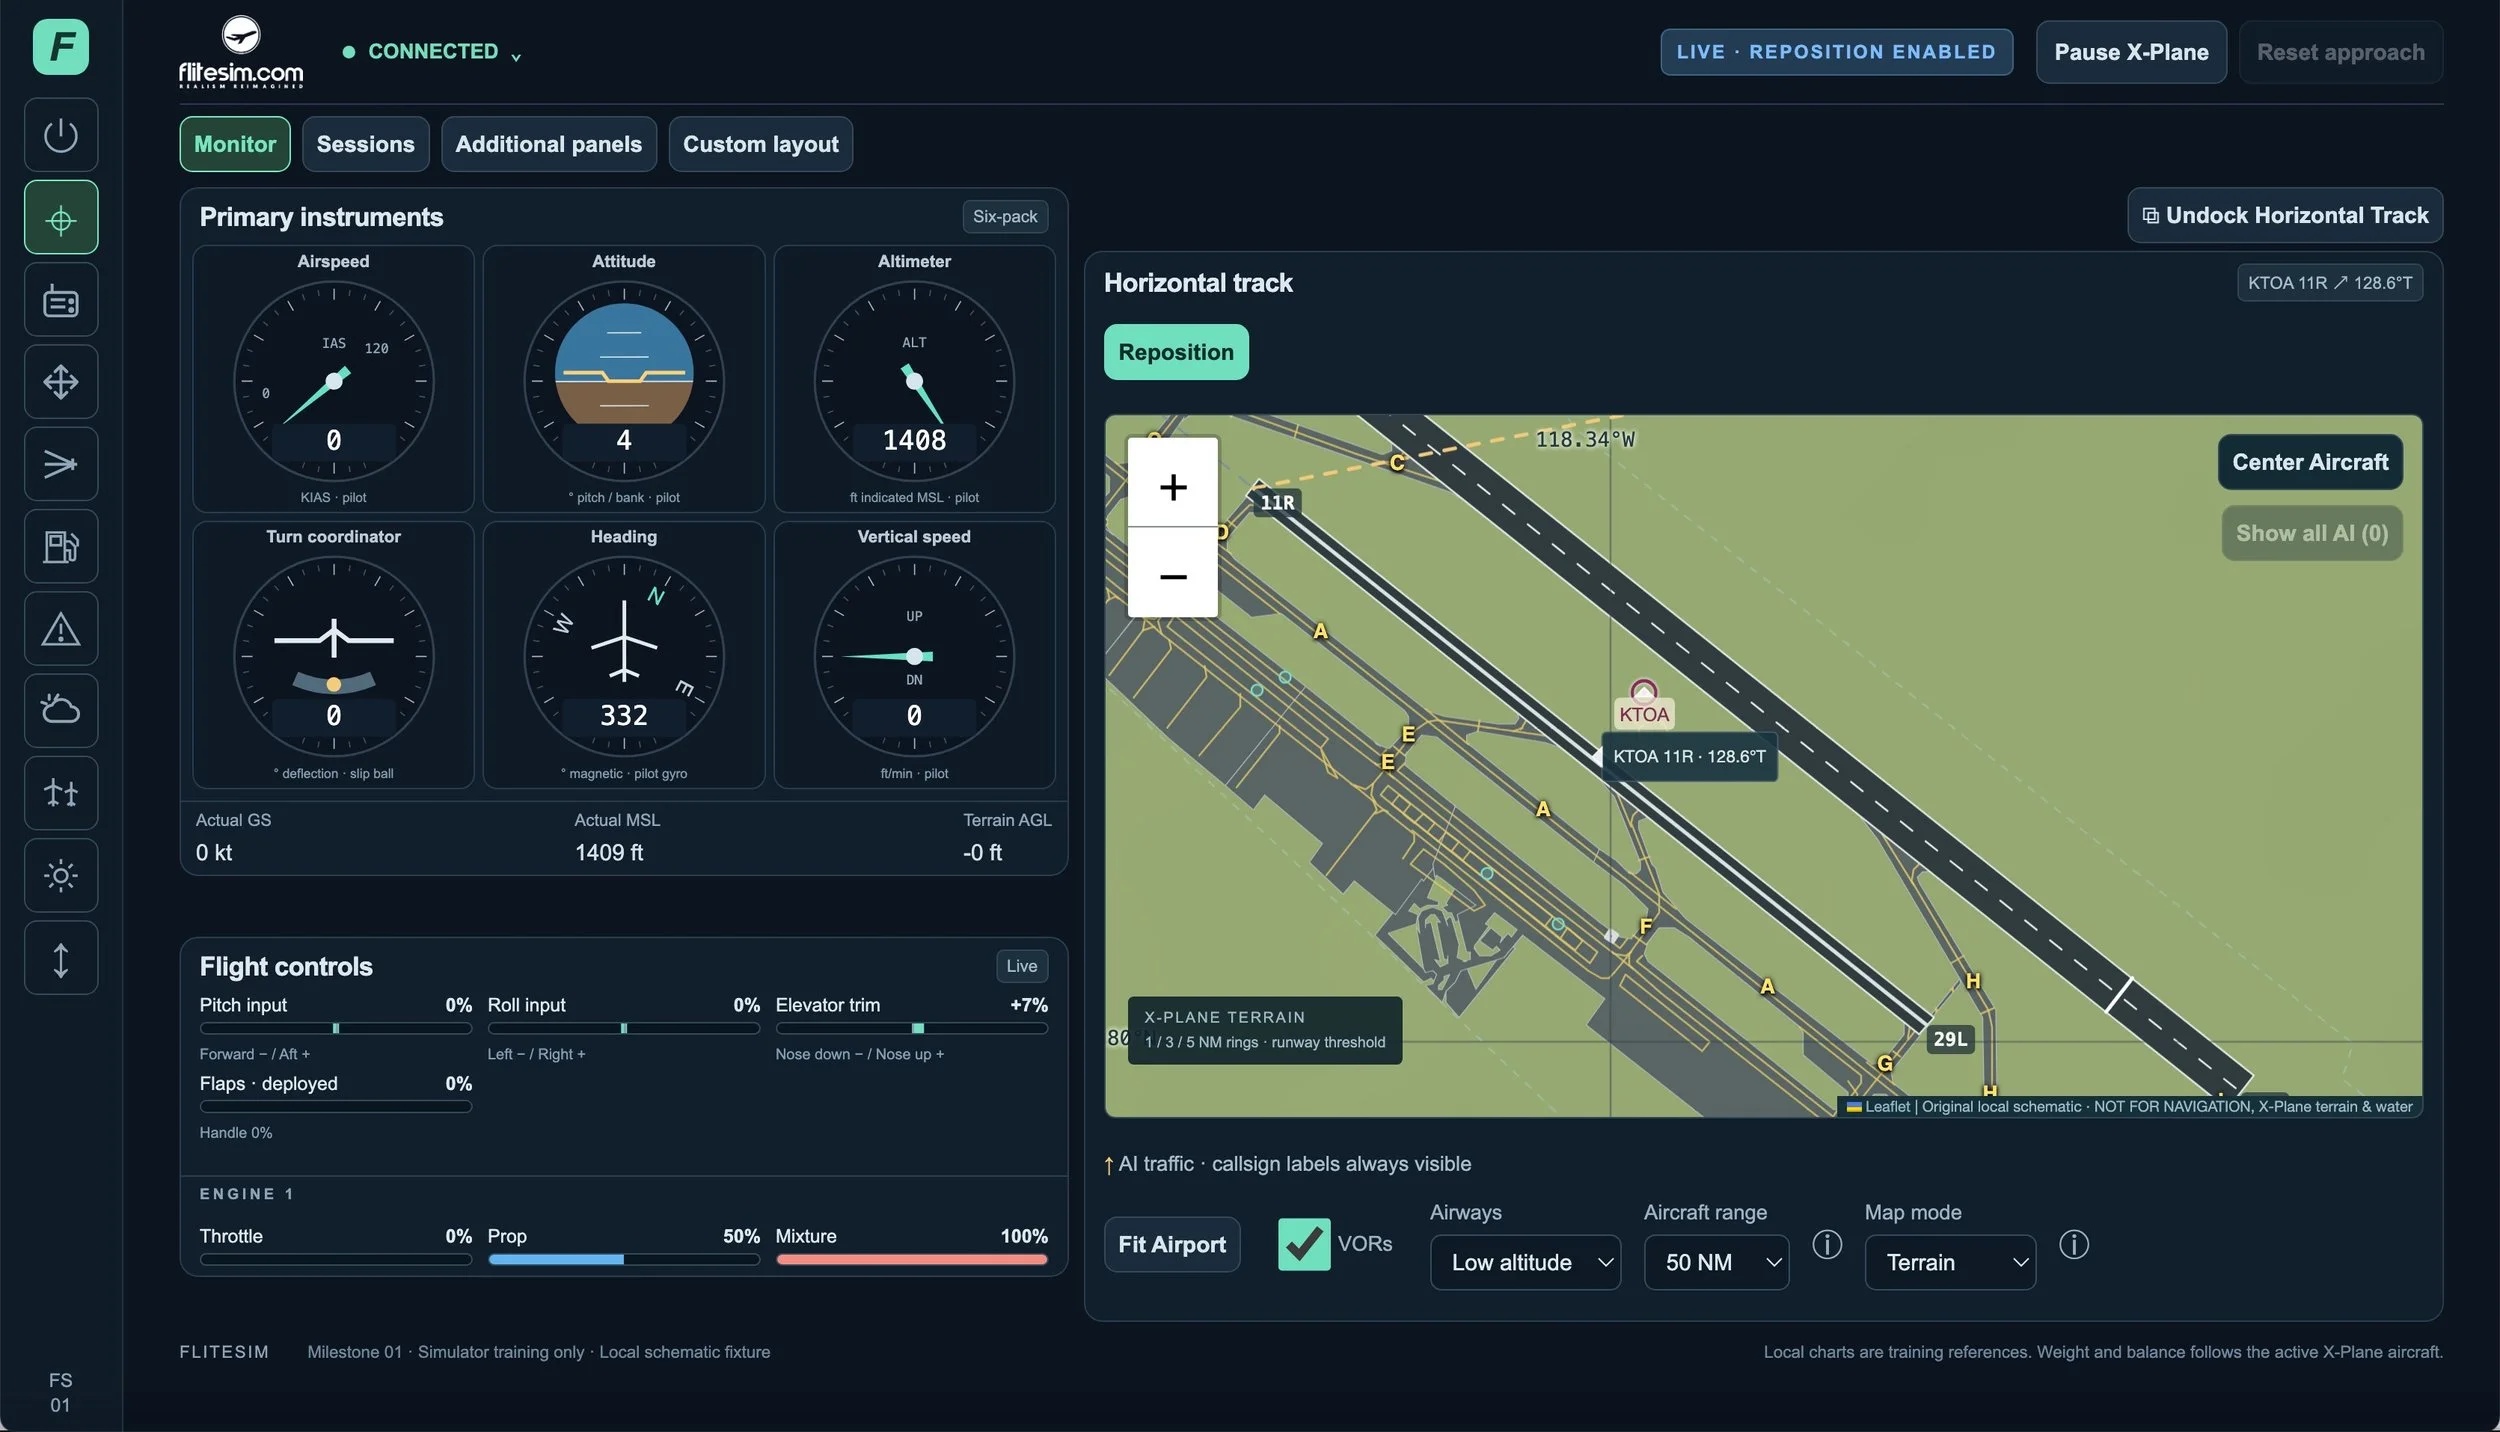
The main Instructor Station dashboard gives the instructor an immediate view of the aircraft and the training session.
Monitor the familiar six-pack instruments, aircraft position, horizontal track, vertical profile, flight-control inputs, trim, flap position and available engine controls. Pause the simulator when an explanation is needed, and resume when the student is ready.
Forward View can display a local browser capture of the X-Plane window, allowing the instructor to relate the pilot’s visual picture to the aircraft’s instruments, controls and flight path. Forward View and Horizontal Track can also be undocked so they remain visible while the instructor moves between other workspaces.
Arrange the dashboard around the lesson. Move panels, select full- or half-width layouts and save named arrangements for different training activities.
Use Monitor, Sessions and Additional panels to focus on the activity at hand. Custom layouts open in Fit screen mode, with the full saved arrangement available when needed. Take Control is visible in the top header when another browser holds command authority.
NAV/COM
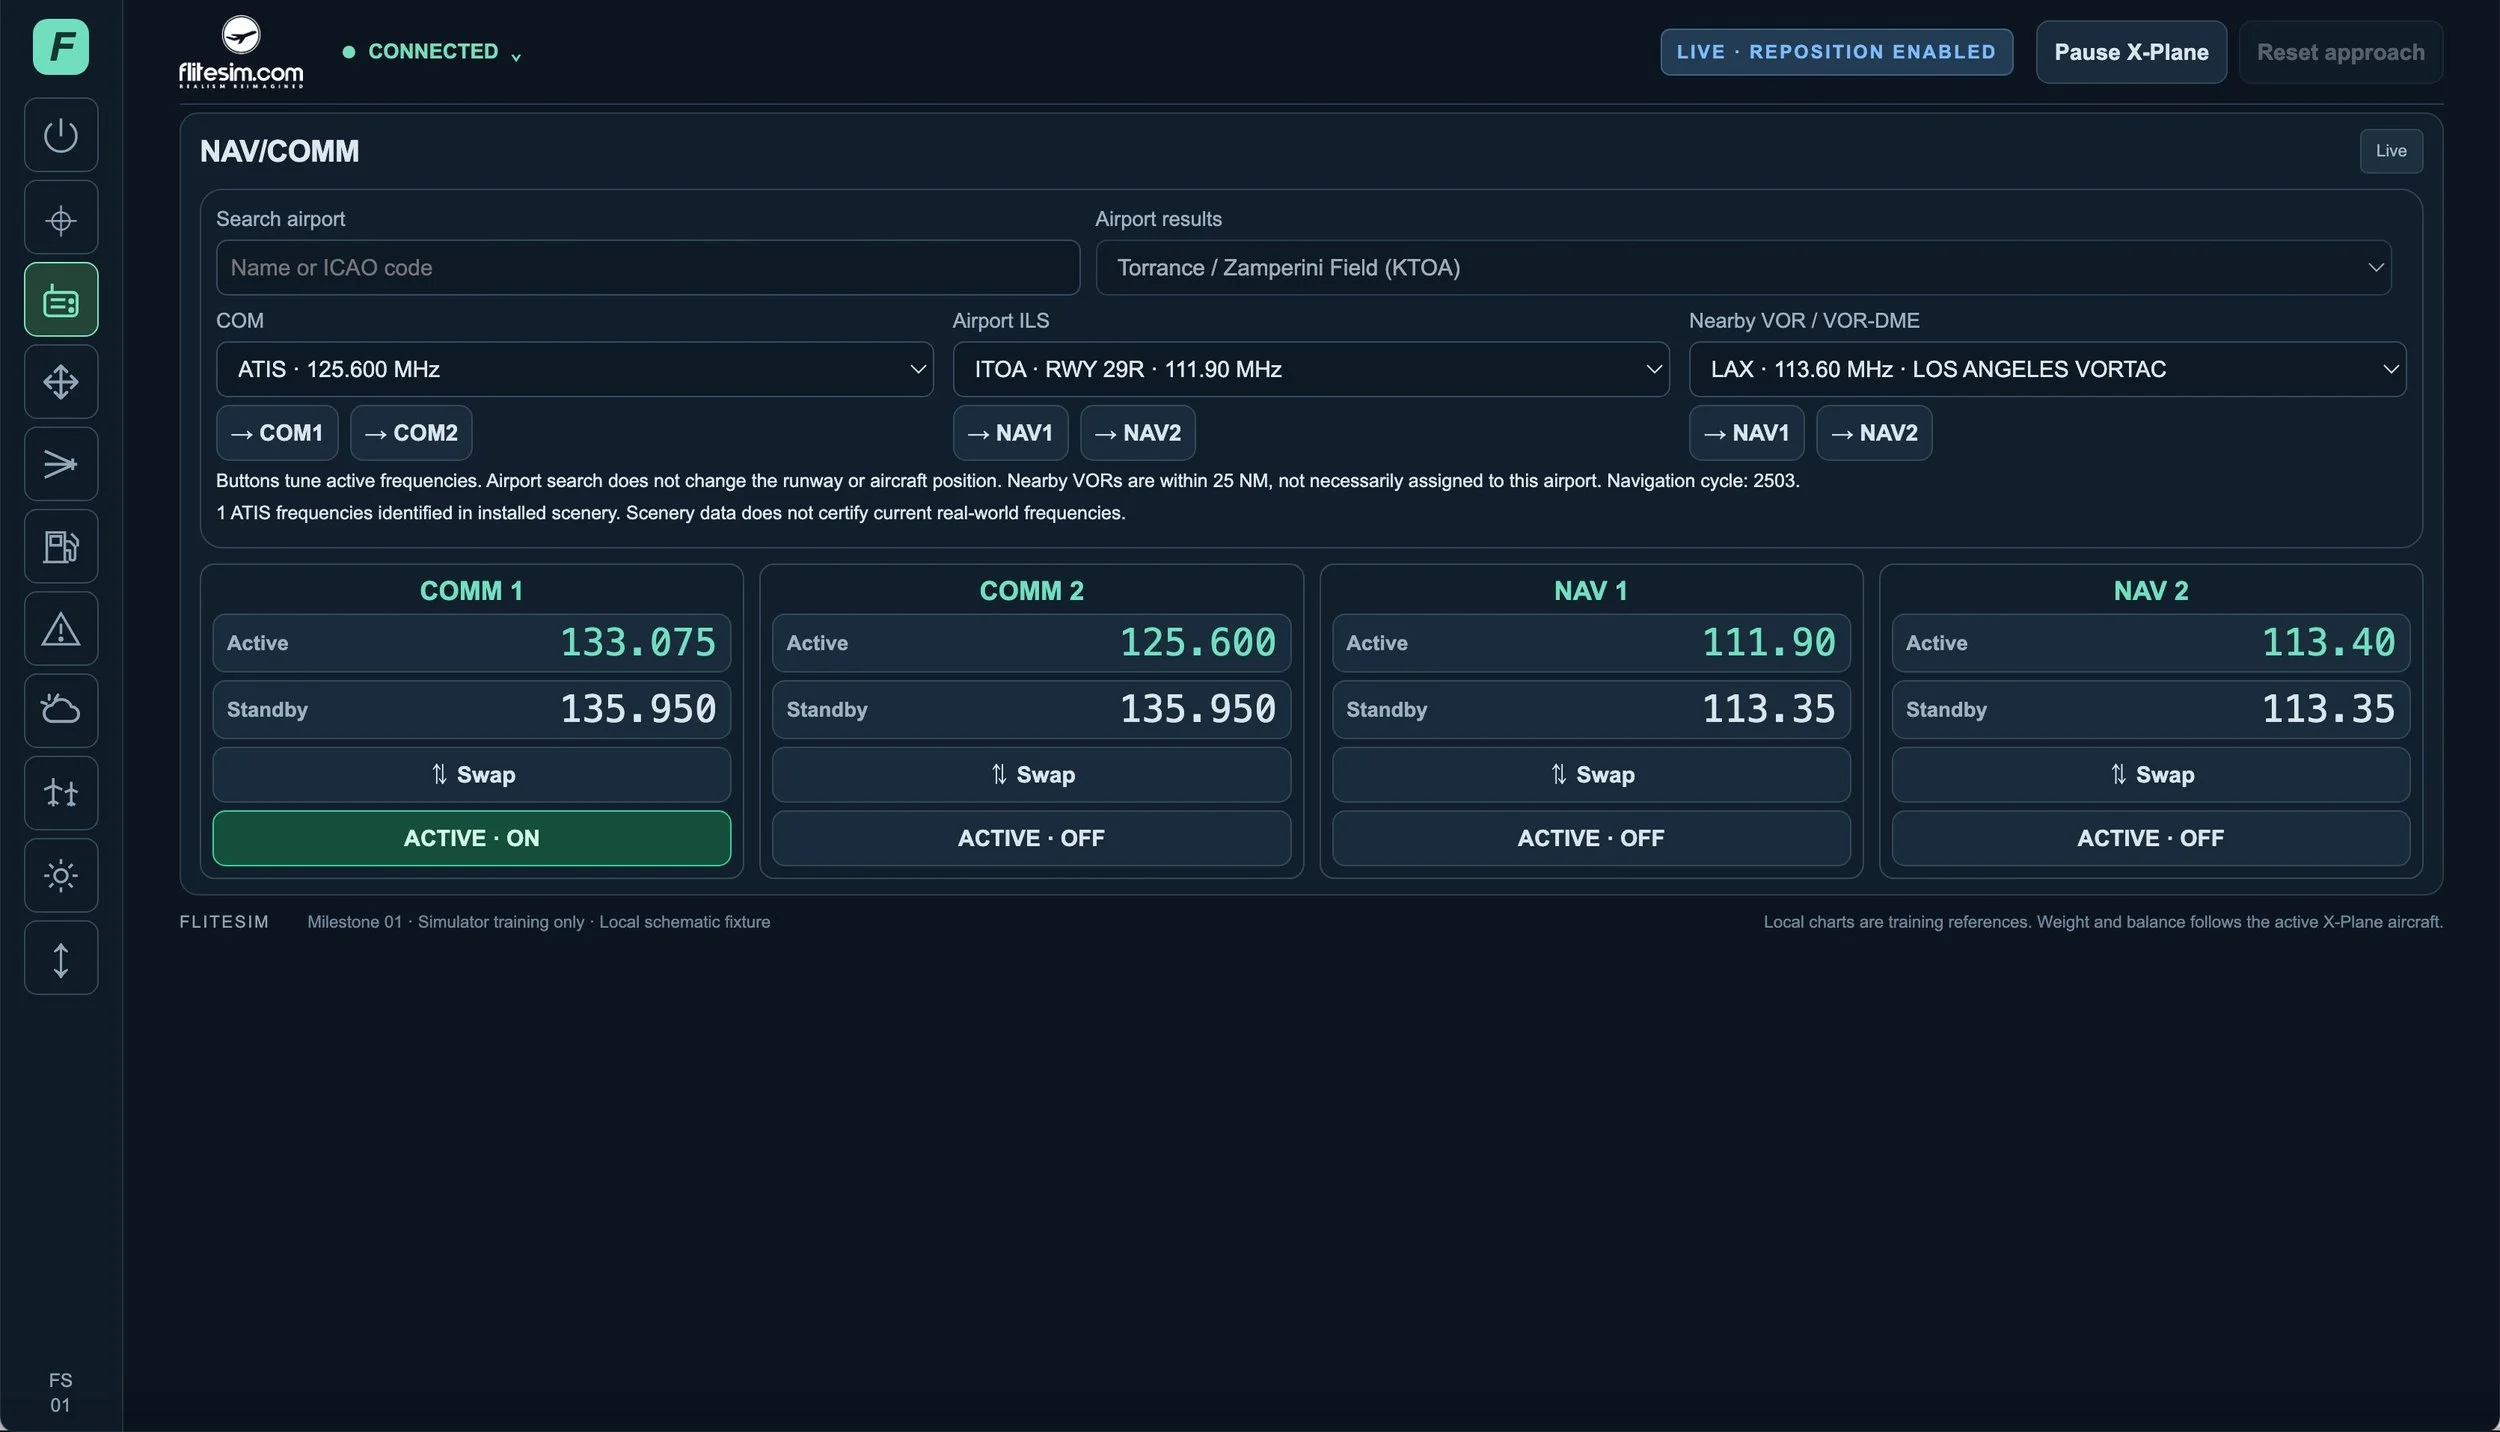
The NAV/COM panel brings the aircraft’s communication and navigation radios into one dedicated workspace, helping the instructor prepare frequencies and manage radio changes throughout the lesson.
Monitor active and standby frequencies for COM 1, COM 2, NAV 1 and NAV 2. Select a frequency to edit it directly, move through valid channels with the channel controls or slider, and apply the new setting. Swap active and standby frequencies to practise frequency changes and prepare the next stage of a flight.
Find frequencies using the airport search. Search by airport name or ICAO code, then select from available communication frequencies, airport ILS facilities and nearby VOR or VOR-DME stations. Tune a listed frequency directly into either compatible radio’s active bank. Browsing another airport does not change the exercise runway or reposition the aircraft.
Manage each radio’s listening state using its ACTIVE ON/OFF control, where supported by the aircraft and connected adapter. Clear Live, Stale and Replay indications help distinguish current readings from held or recorded data, while unavailable controls remain disabled.
The compact layout keeps airport lookup, frequency selection and all four radios together without page scrolling on supported desktop layouts. Frequency information comes from installed simulator scenery and navigation data, with the navigation cycle and ATIS availability shown for reference.
AIRCRAFT REPOSITIONING
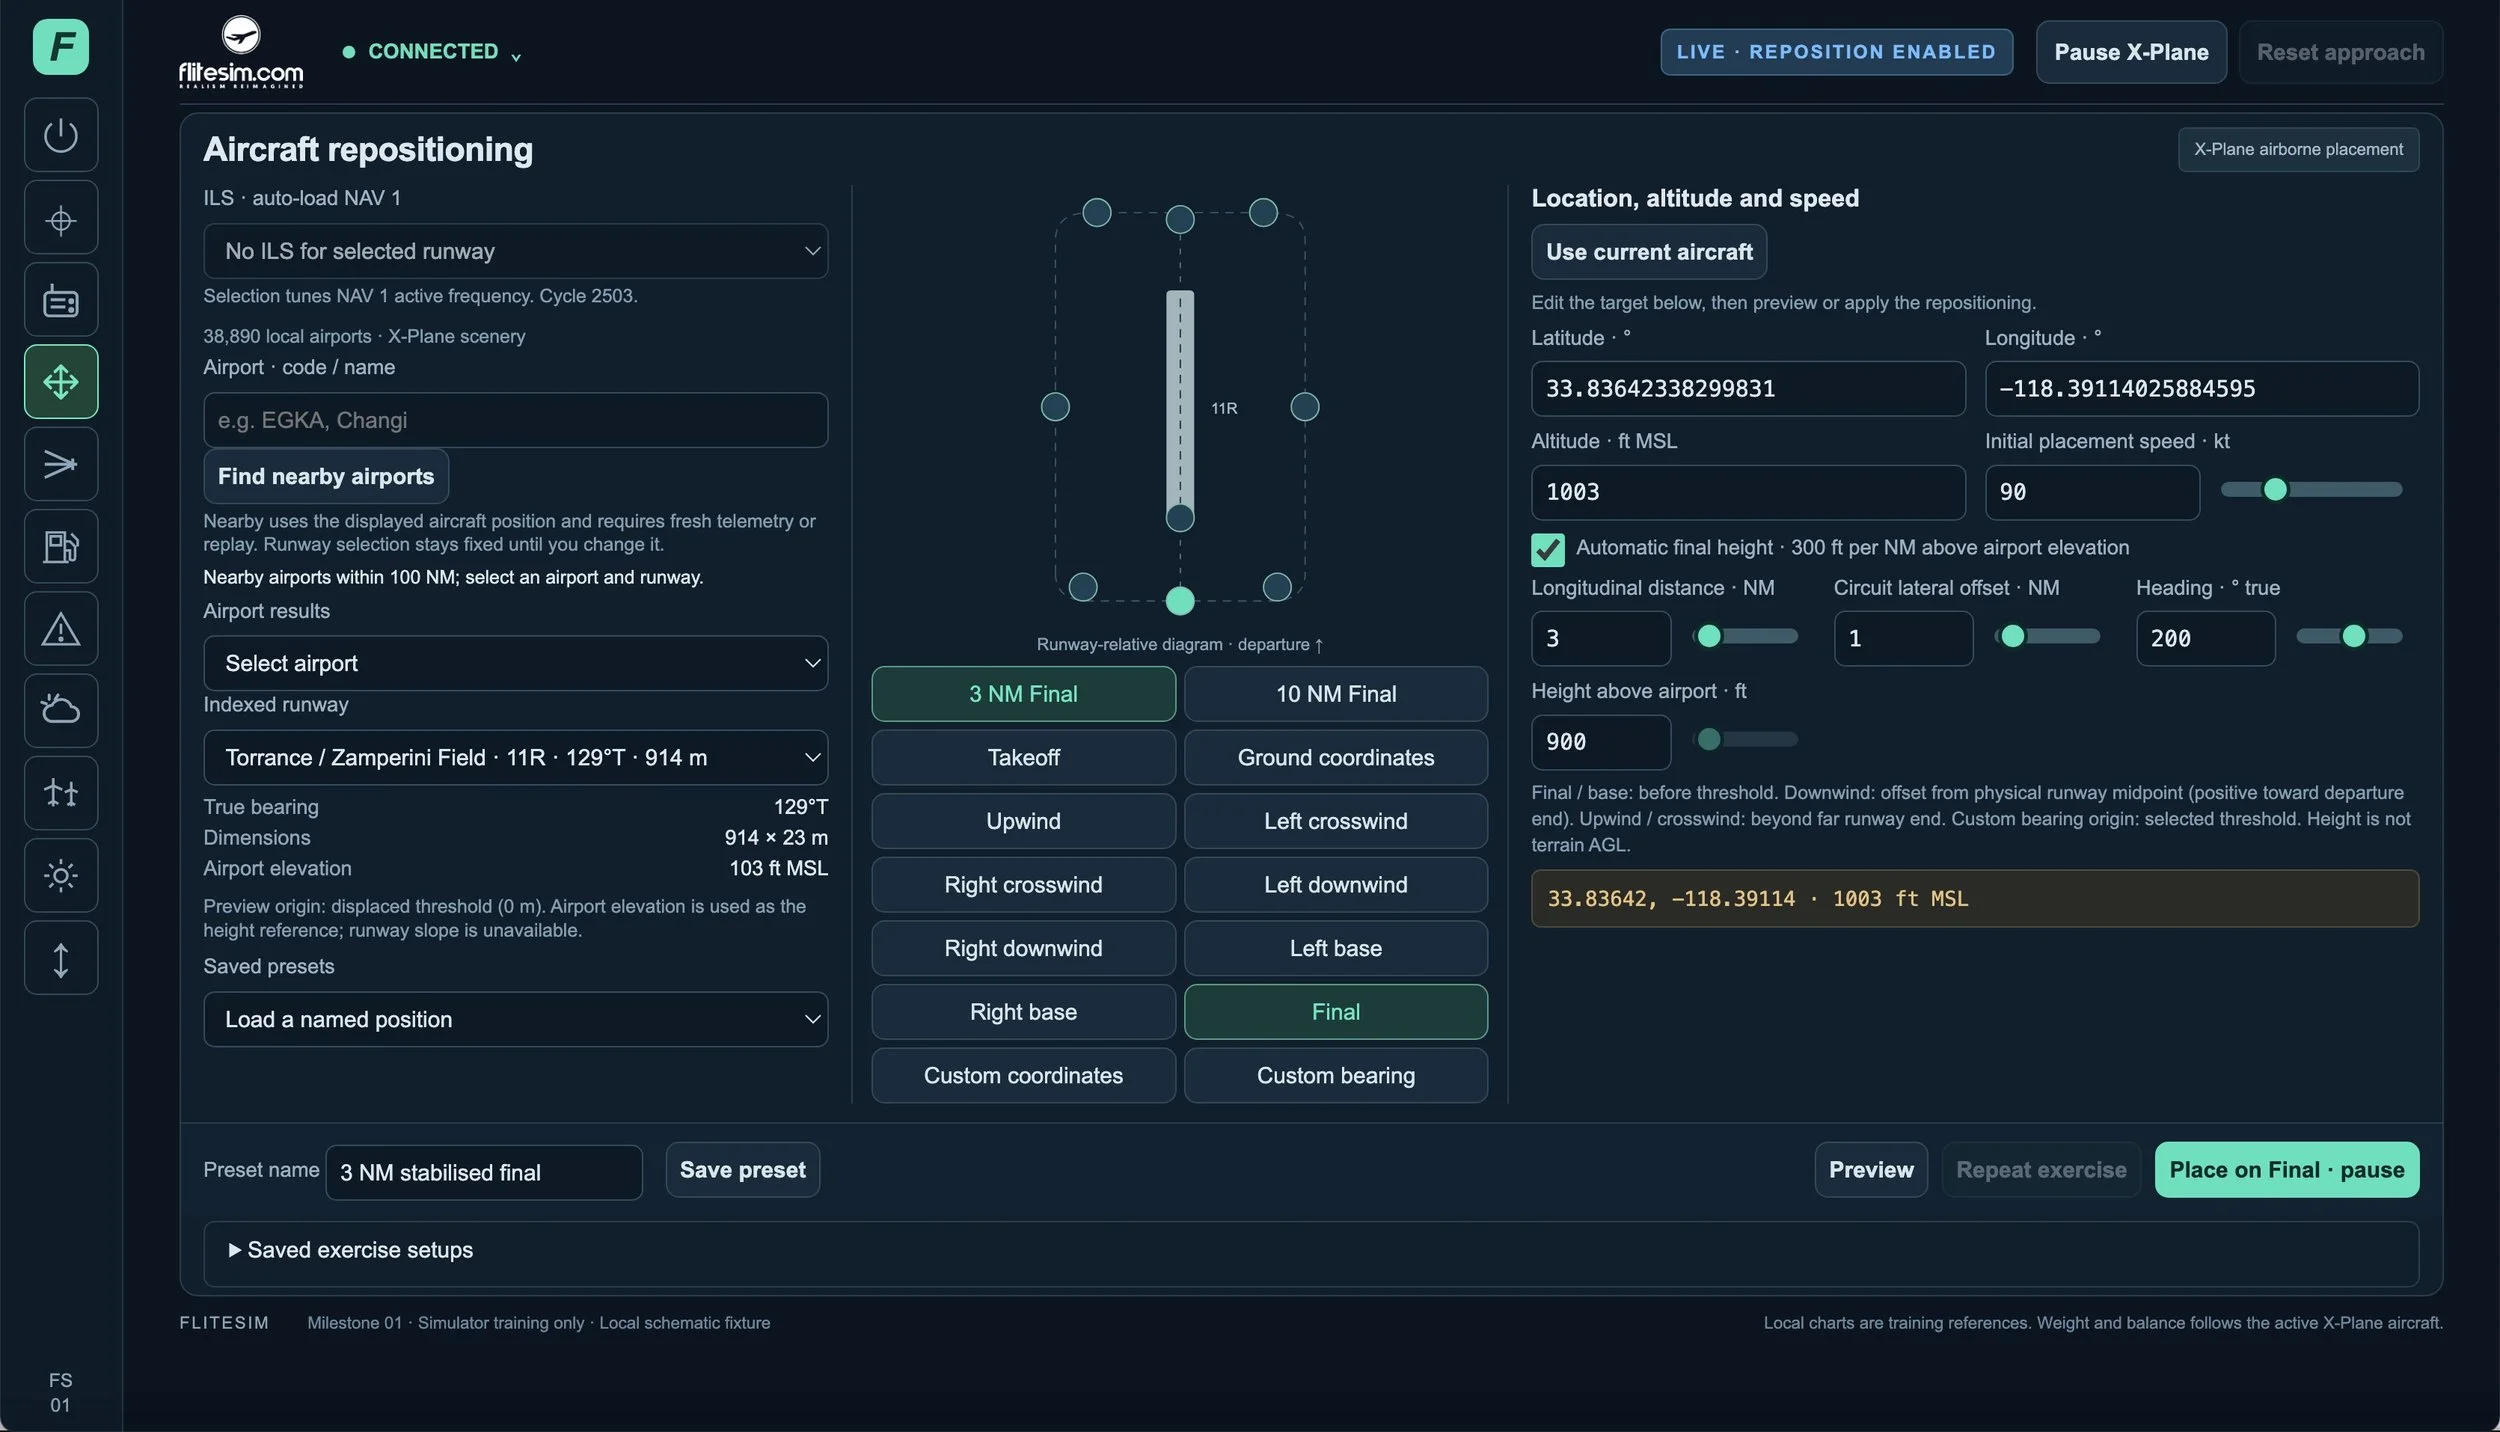
Repeat the manoeuvre that matters without flying the entire route again.
Aircraft Repositioning lets the instructor search the installed X-Plane airport database, select a runway and preview the next starting position. Place the aircraft for takeoff, upwind, crosswind, downwind, base or final, or create a custom airborne or ground position.
Ready-made 3 NM and 10 NM final options reduce setup time. For a tailored exercise, adjust distance, circuit offset, heading, height and initial speed using touchscreen-friendly sliders and precise value fields. Save named positions and complete runway setups for consistent lessons across students and sessions.
Airborne placement leaves X-Plane paused so the instructor can verify the setup before handing control back to the student.
INSTRUMENT APPROACH
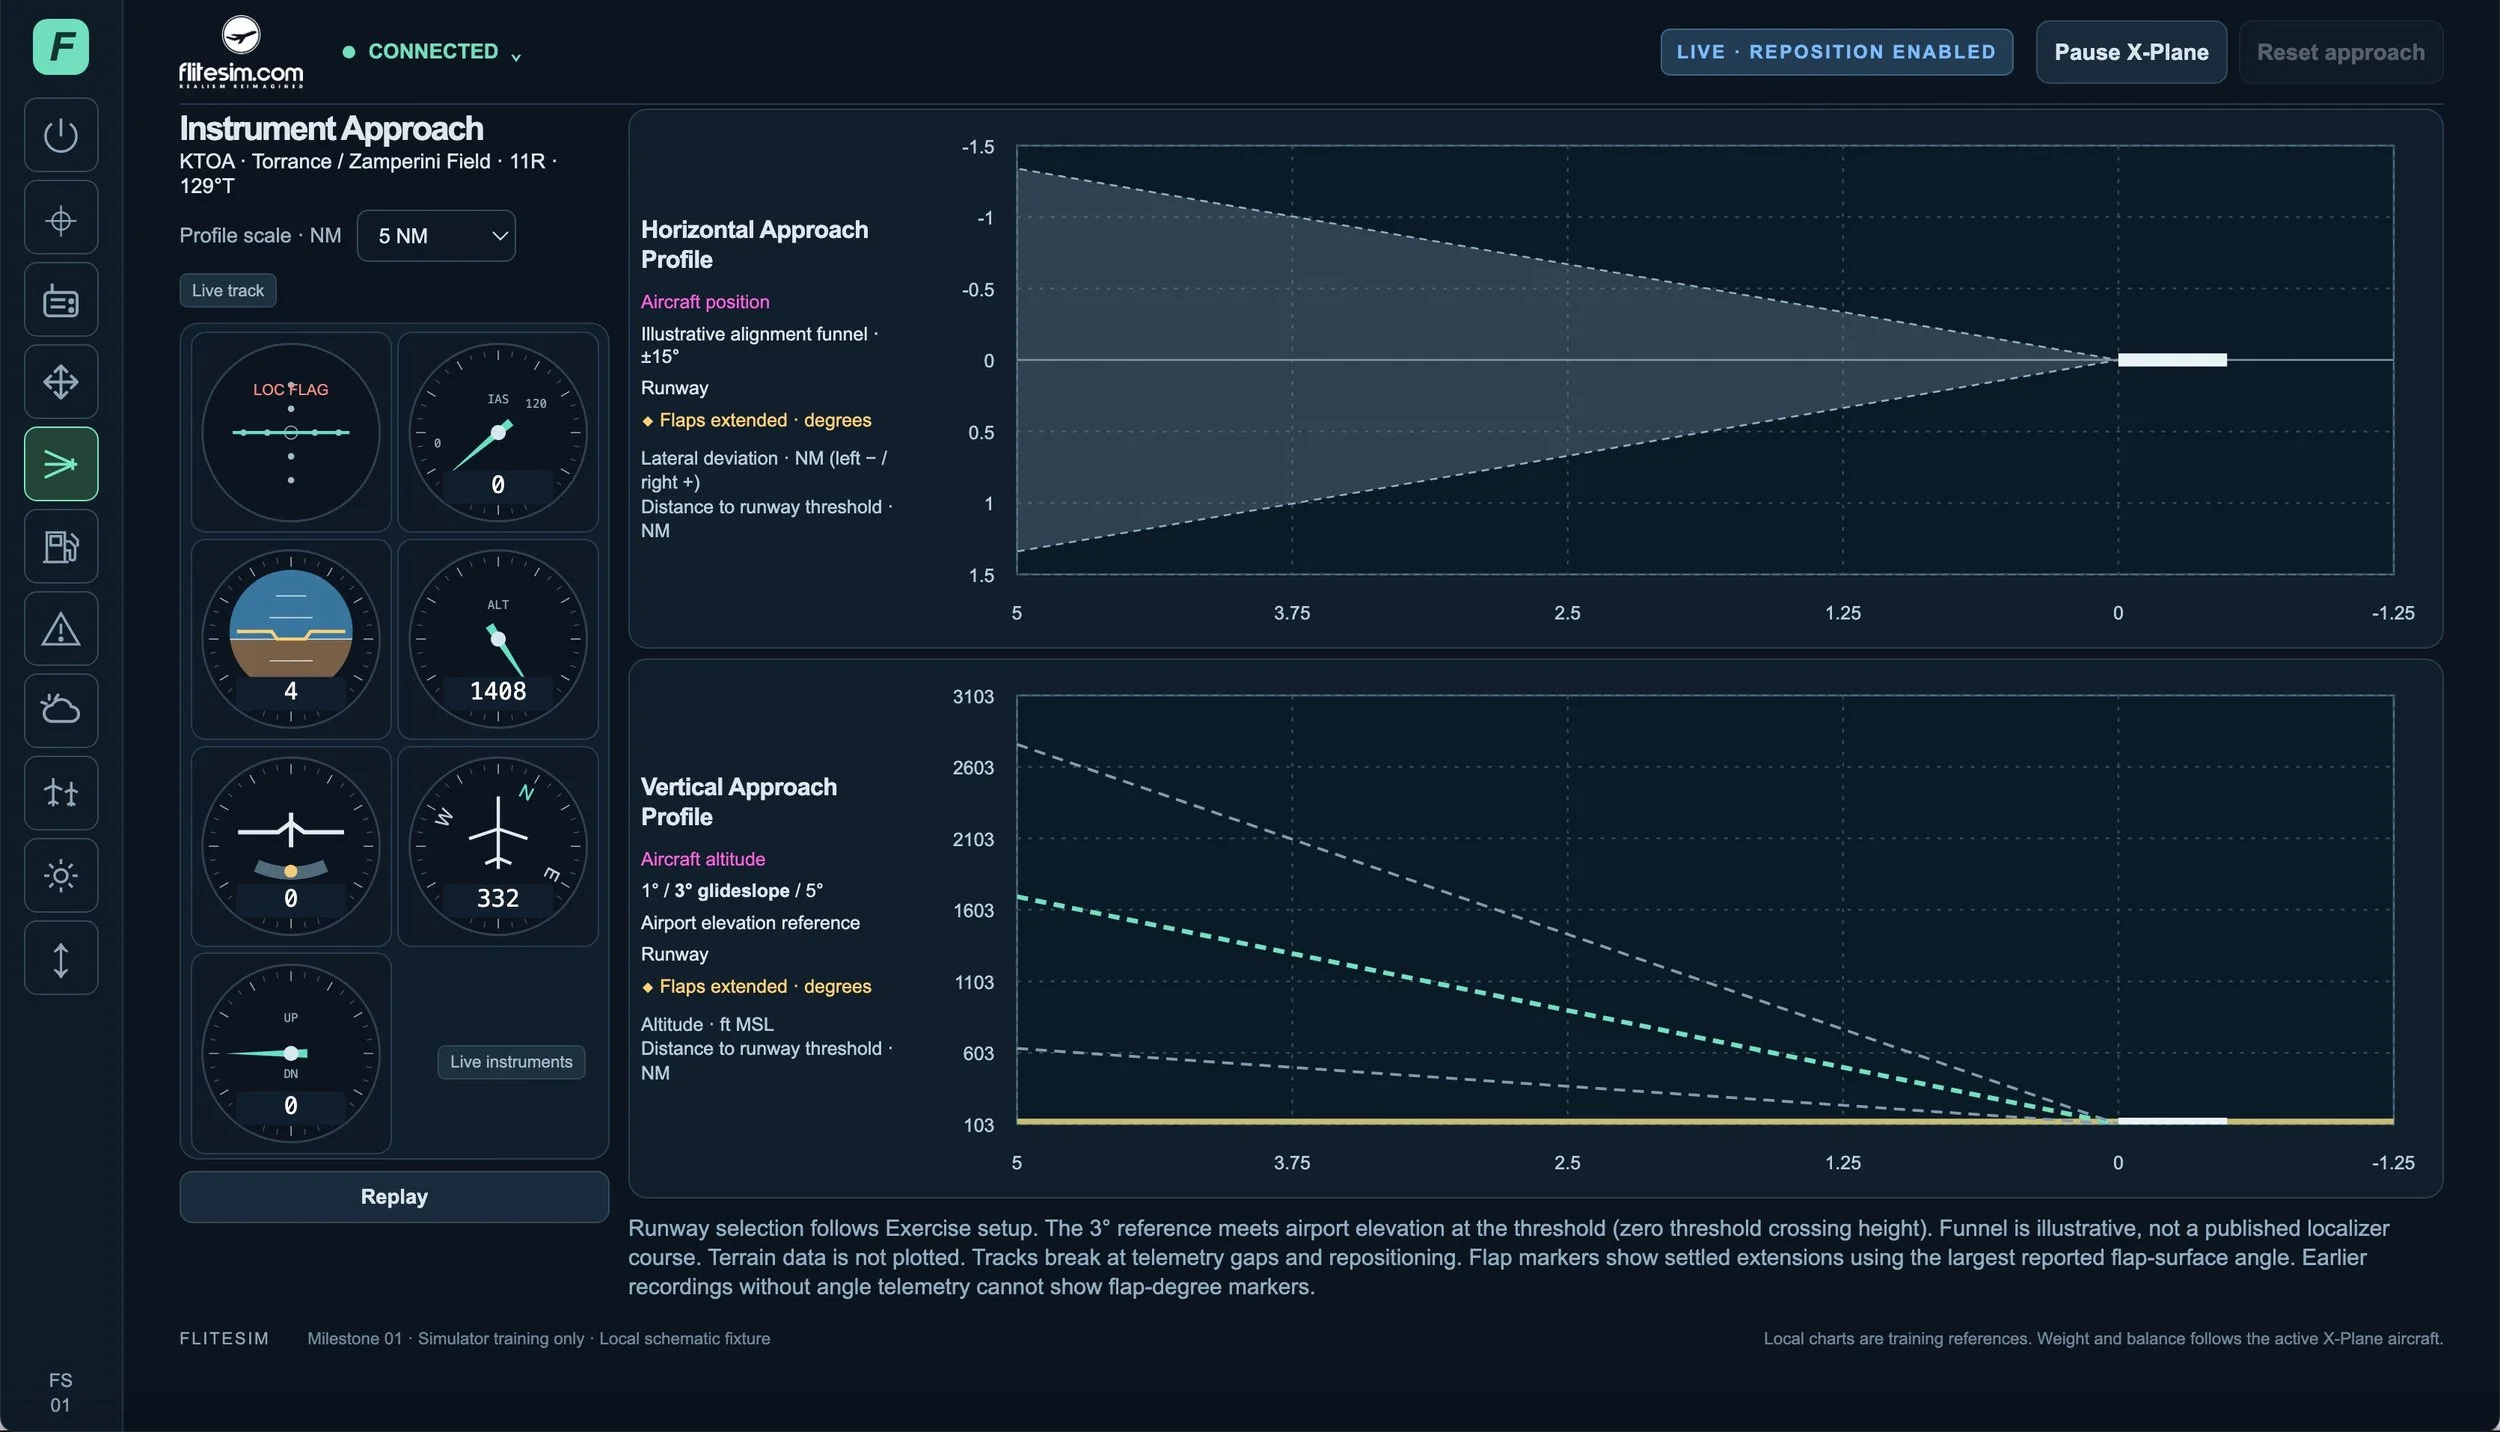
The Instrument Approach workspace combines the pilot’s instruments with runway-relative vertical and horizontal flight-path displays.
Follow the six-pack and NAV 1 ILS indications while the Vertical Approach Profile plots the aircraft’s altitude against distance to the runway threshold. A central three-degree reference, supported by one-degree and five-degree guide lines, makes a high, low or unstable descent easier to identify and discuss.
The Horizontal Approach Profile shows the aircraft’s lateral path relative to the extended runway centreline. Select a 5, 10, 15 or 20 nautical-mile scale, follow the aircraft marker and review reported flap-extension points along the approach.
Instead of describing a deviation only after landing, the instructor can show the student where it developed and relate it to the instrument indications and aircraft configuration.
The Horizontal Approach Profile sits above the Vertical Approach Profile, with the title, profile scale and live instruments grouped on the left. Use the Replay button below the instruments to show or hide X-Plane’s replay controls.
CUSTOM WEATHER
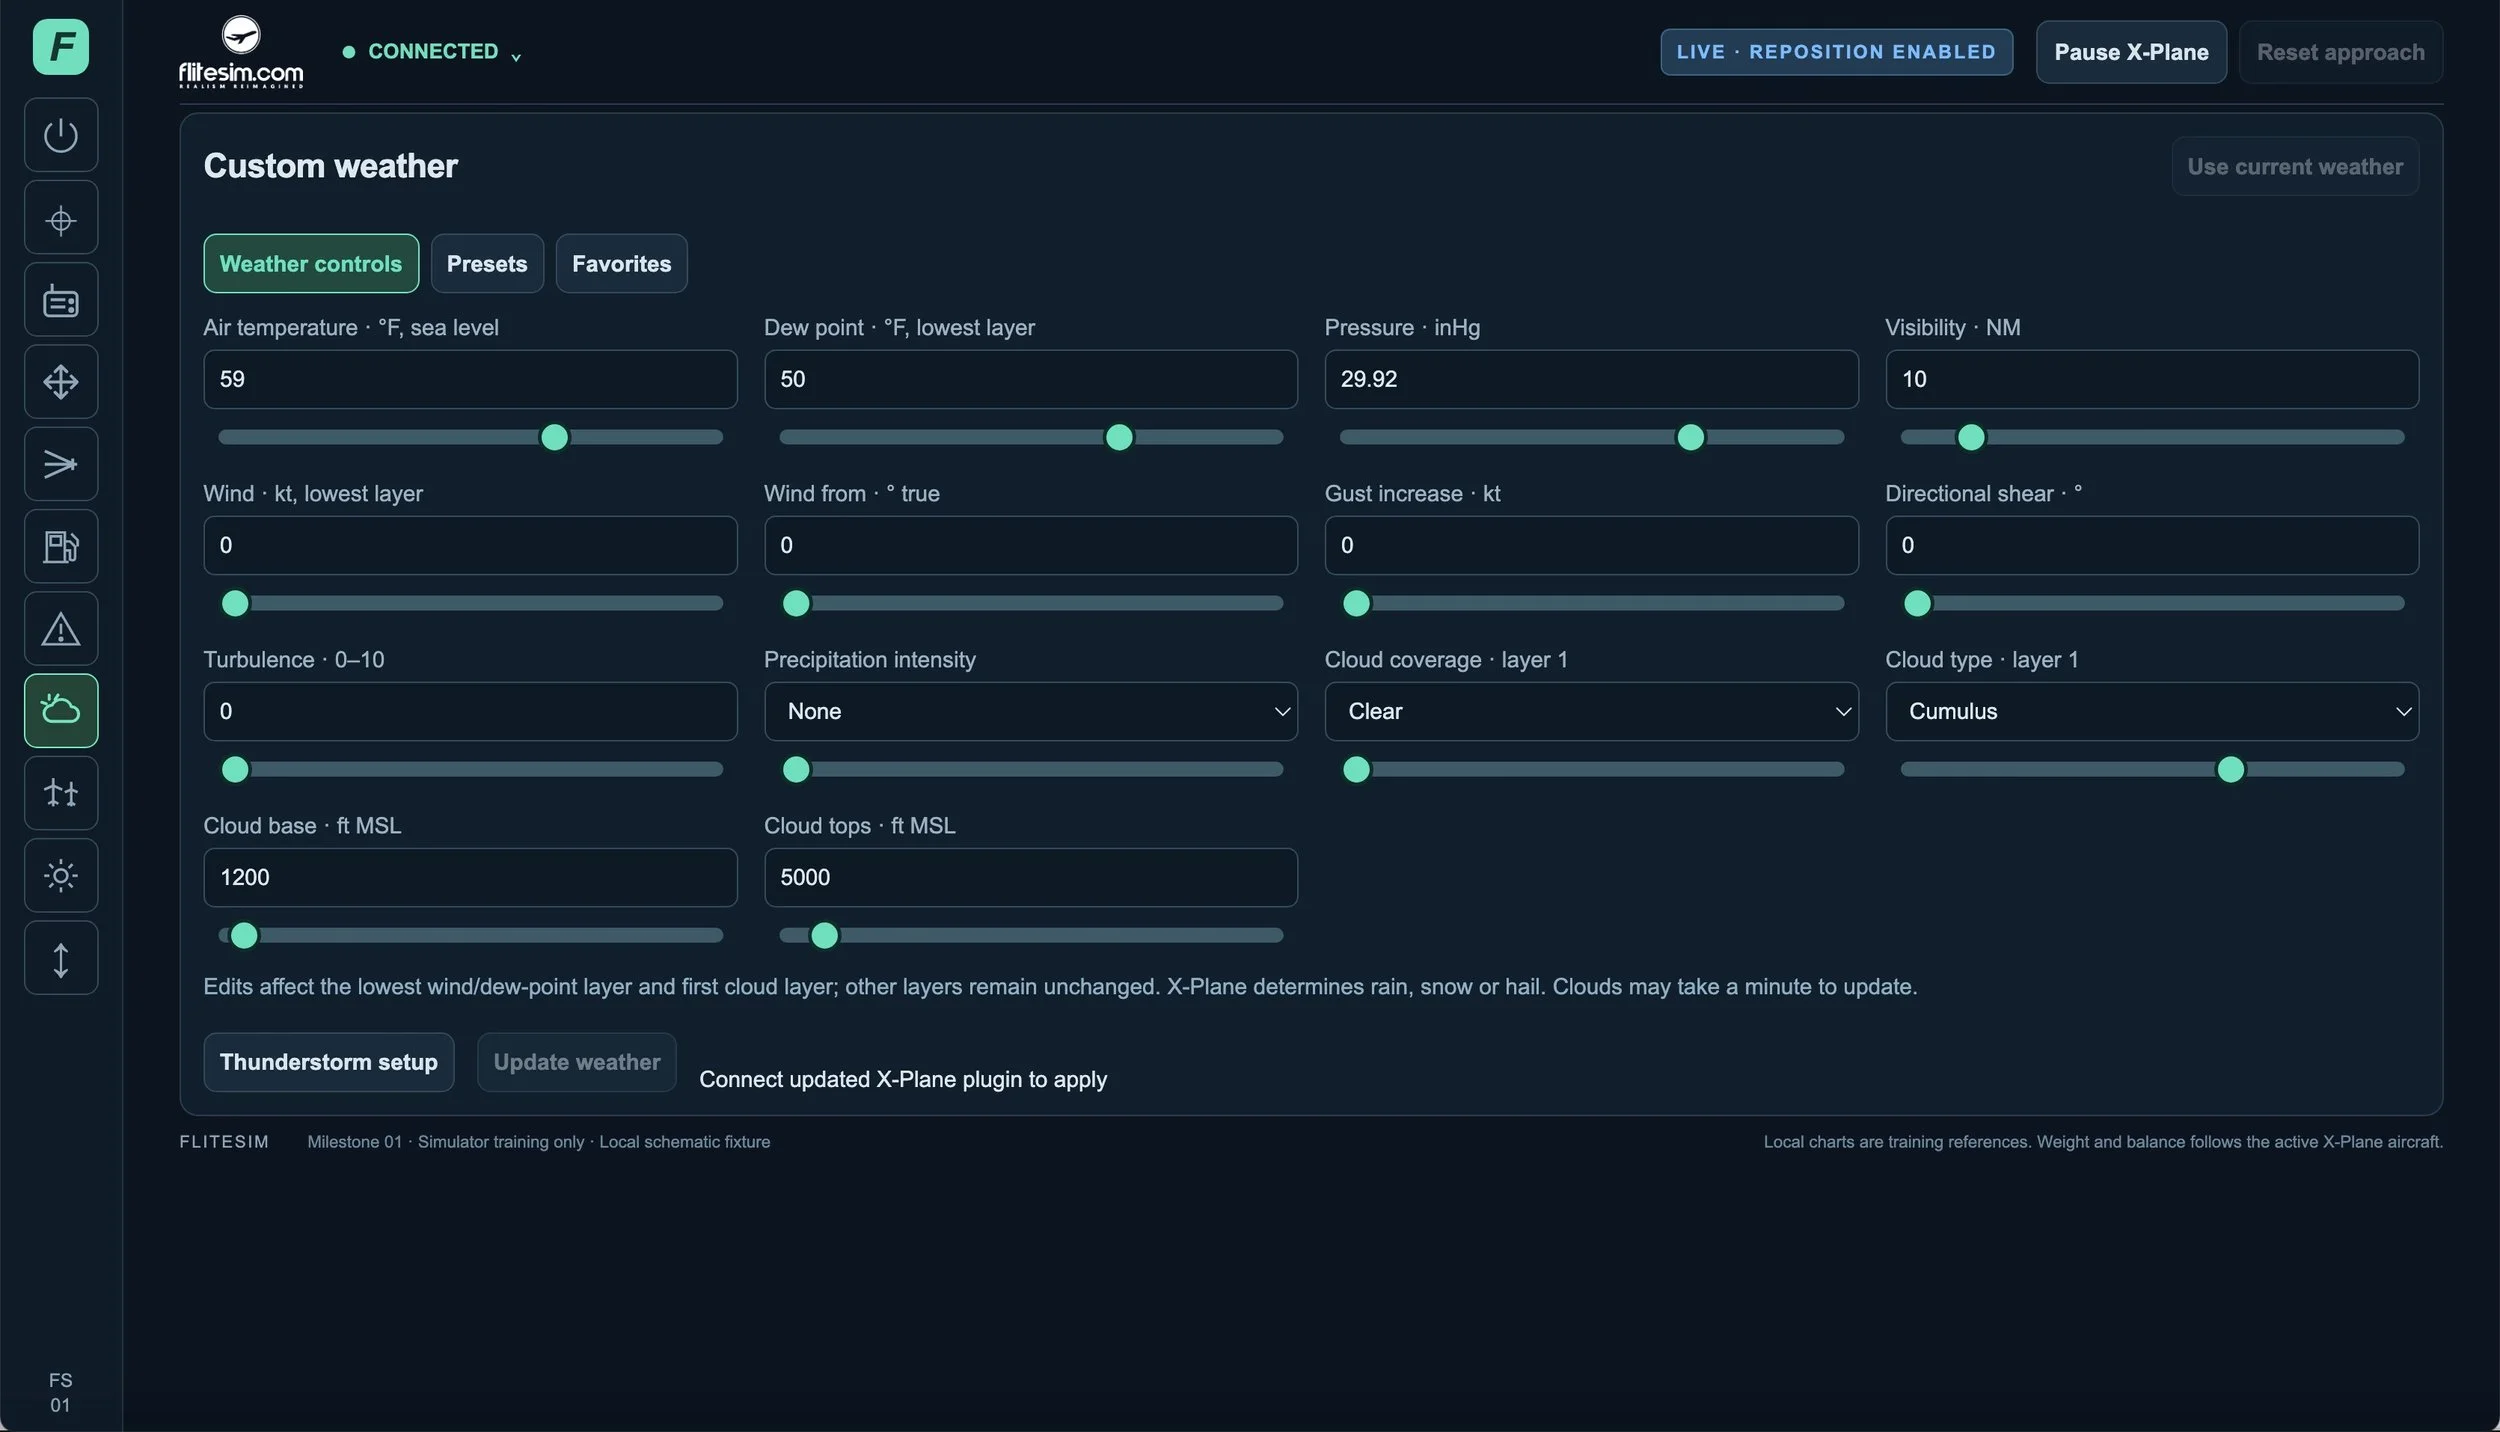
Move from a calm VFR exercise to demanding weather without leaving the instructor interface.
Start with a weather preset, use the current simulator weather as a baseline or refine the conditions with direct controls.
Adjust temperature, dew point, pressure, visibility, wind speed and direction, gust increase, directional shear, turbulence, precipitation and the first cloud layer.
Touch-friendly sliders make broad changes quick, while value fields support precise setup. Save useful combinations as favourites so recurring exercises can begin with consistent conditions.
The dashboard also includes a time-of-day control for daylight, dusk and night exercises.
FUEL & CENTRE OF GRAVITY
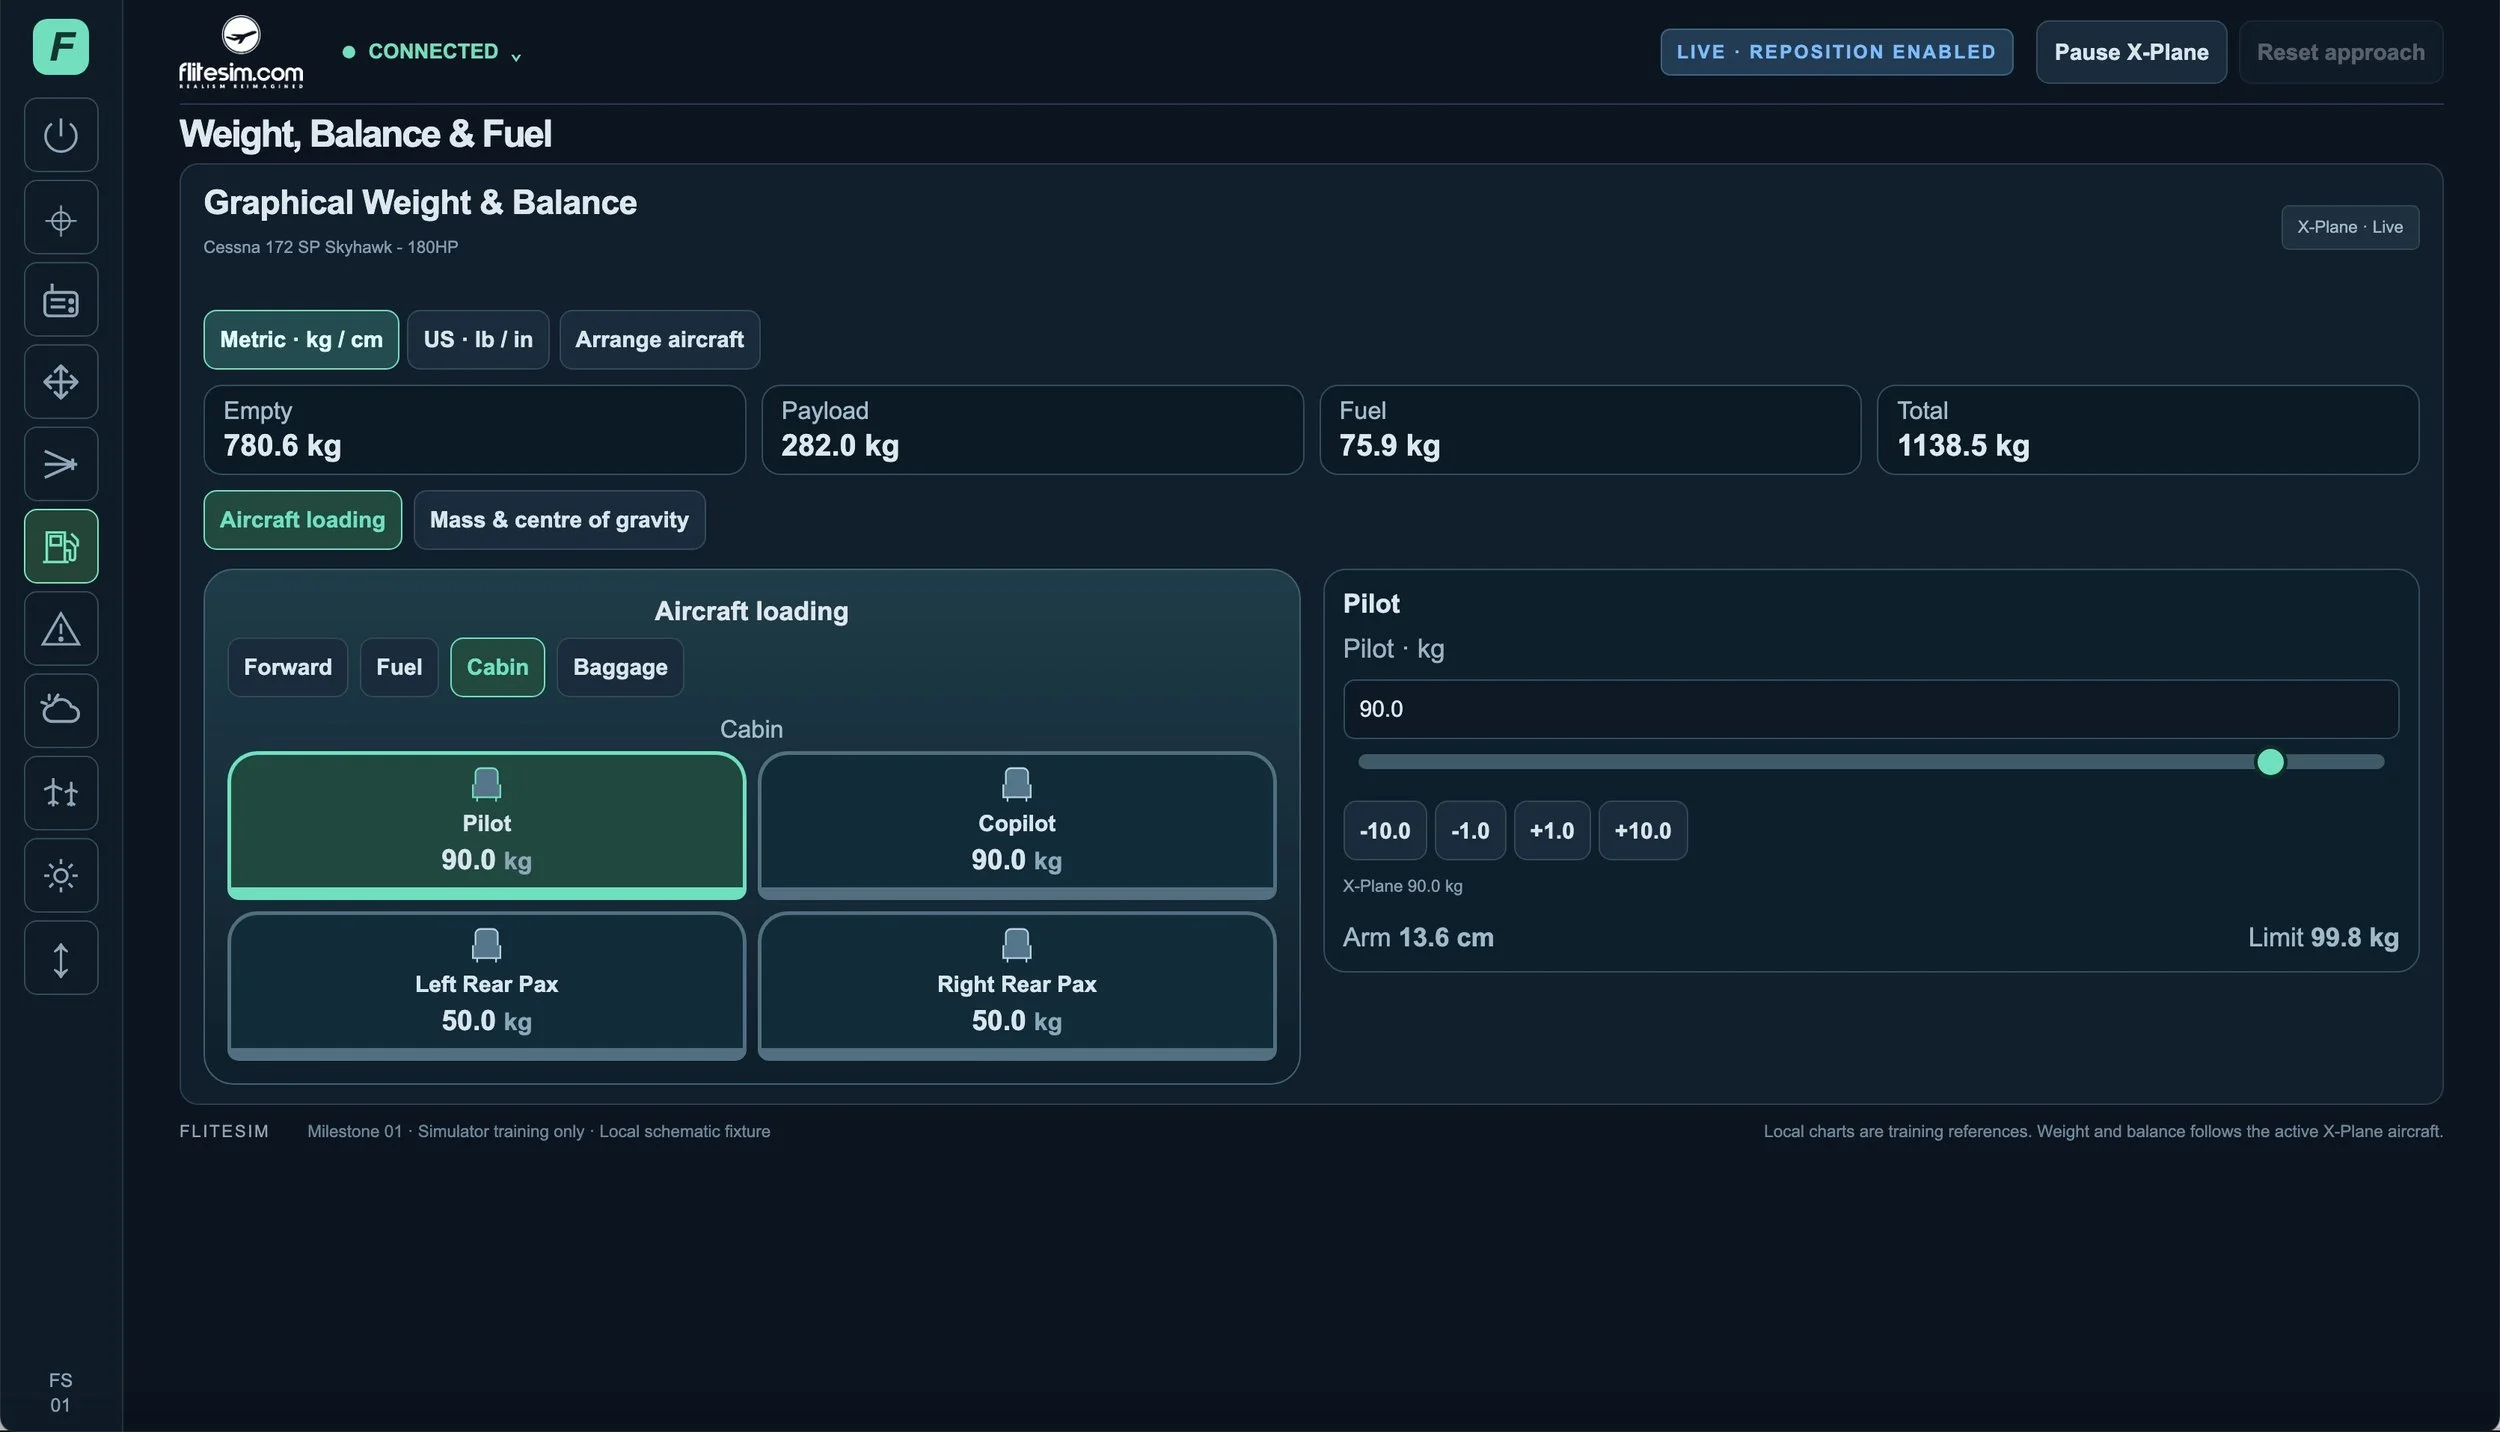
Use the Fuel & Centre of Gravity workspace to explore how aircraft loading affects handling, performance and operating decisions. The graphical Weight & Balance panel brings the active aircraft’s reported loading stations, fuel and mass totals into one view.
Select a supported payload or fuel station and adjust its load with a slider, precise numeric entry or increment buttons. Review the station’s reported arm and limit, and switch between metric and US units. The aircraft-loading view groups stations by area and uses pages to keep the controls within reach.
Open Mass & centre of gravity to compare empty and loaded aircraft mass and CG relative to the aircraft origin. Configure station labels, symbols and layout positions, then save, import or export the aircraft-specific layout.
Available stations, writable controls and reported limits depend on the selected aircraft and X-Plane adapter. The display does not provide a certified CG envelope and complements formal weight-and-balance planning.
FAILURE MANAGEMENT
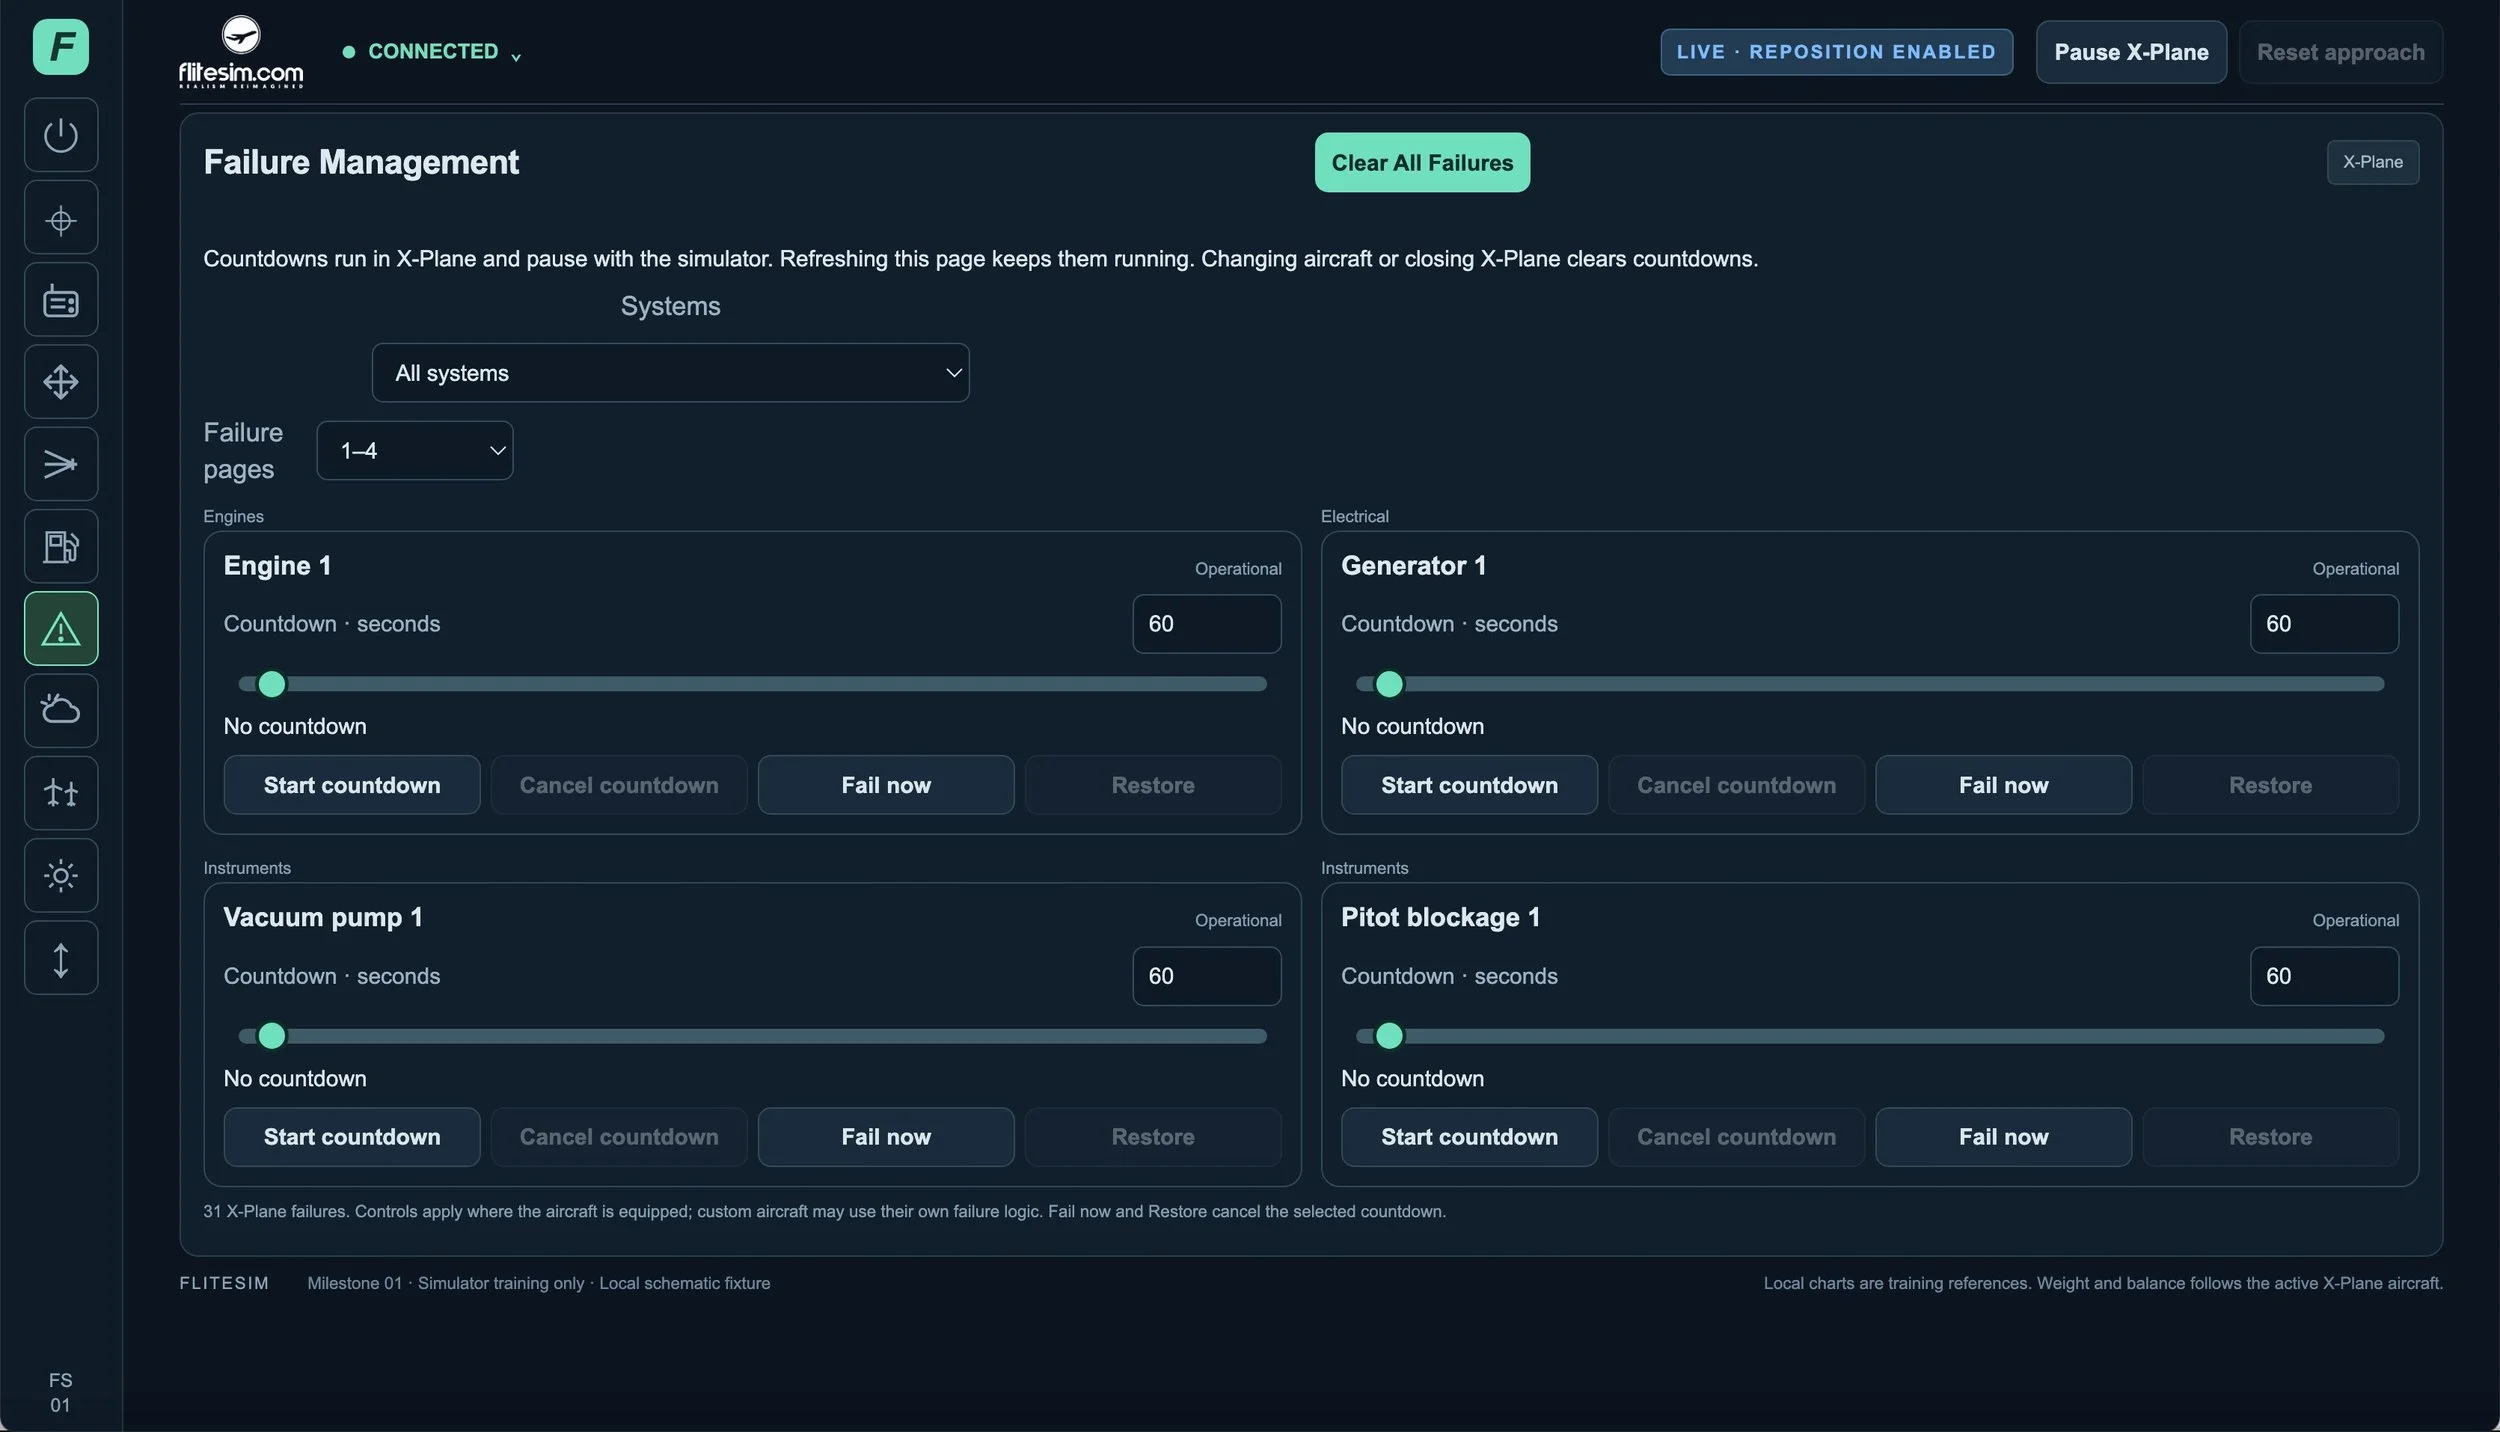
Create recognition, diagnosis and recovery exercises from a dedicated Failure Management workspace.
Choose from supported engine, electrical, instrument, radio, fuel, flight-control, hydraulic and landing-gear failures. Trigger a failure immediately or set an individual countdown so the event occurs later, allowing the instructor to observe the student before the scenario changes.
Each system can be restored independently. Pending countdowns can be restarted or cancelled, and Clear All Failures returns the supported controls to their normal state when the lesson is complete. Timers run inside the X-Plane plugin, pause with the simulator and continue even if the instructor changes browser pages.
Category filtering and four-card pages keep the failure controls readable without a long scrolling list. Countdown values stay in place when switching pages.
ACTIVE TRAFFIC CIRCUIT TRAINING
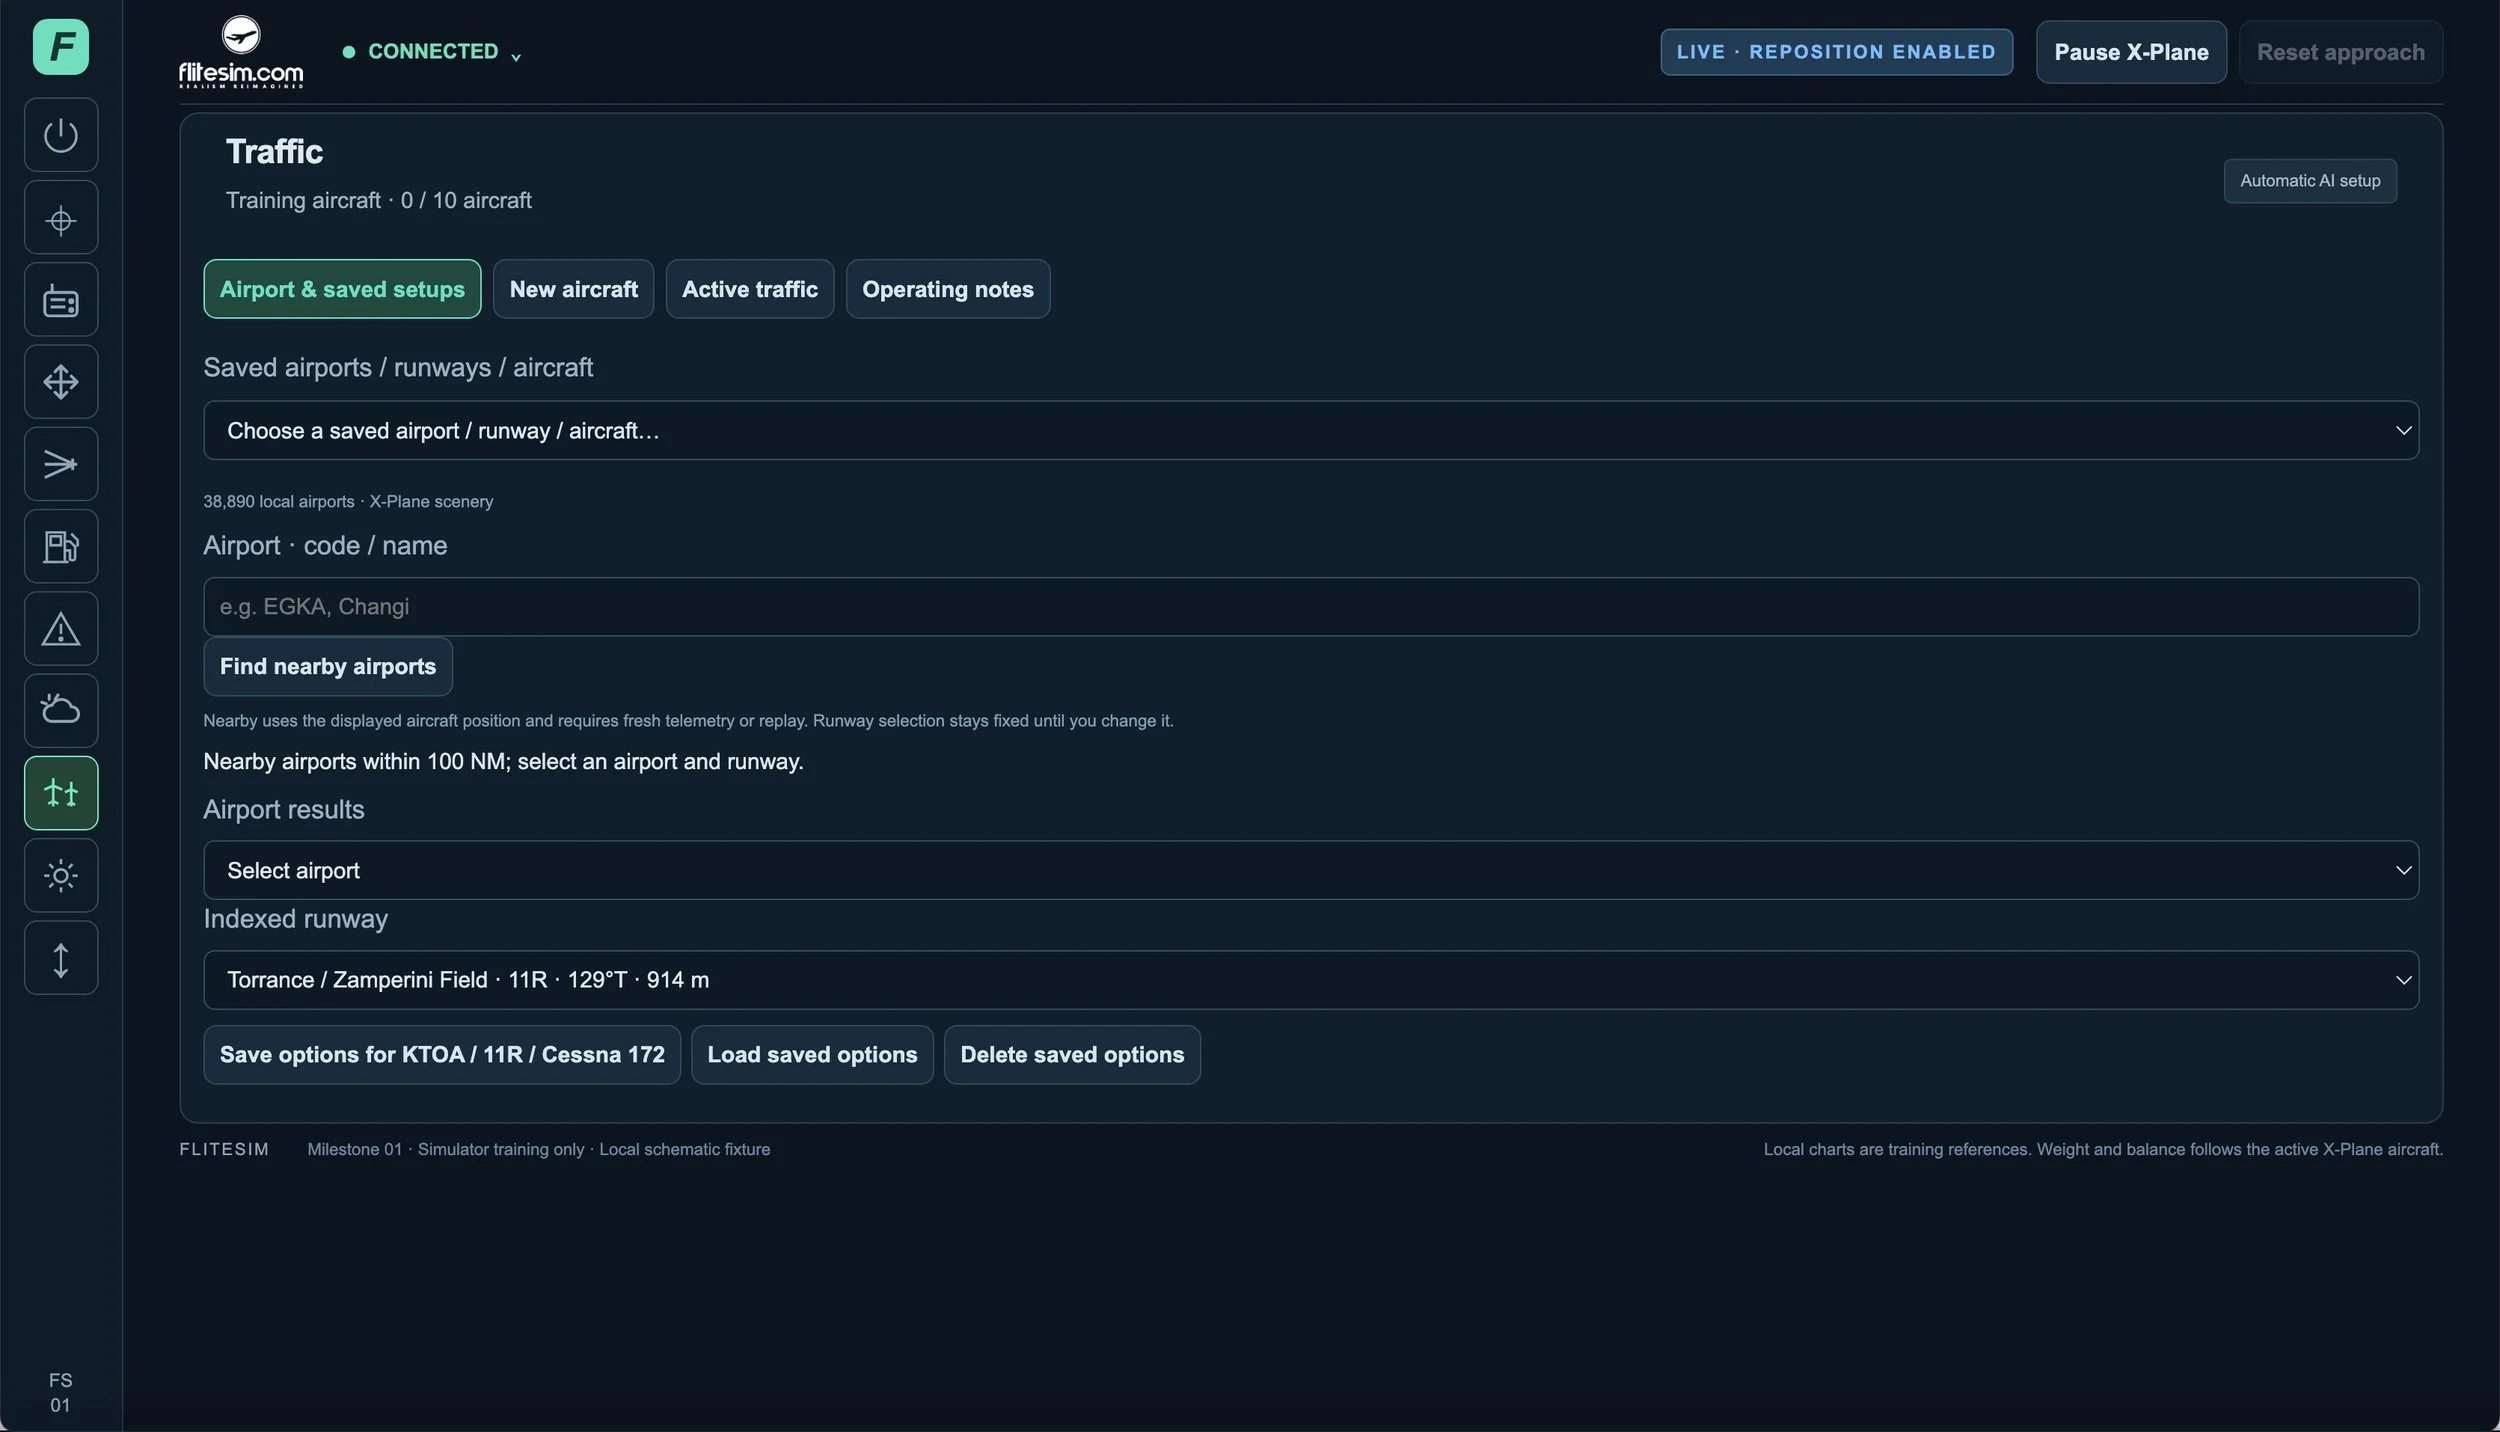
The Traffic workspace adds purposeful training aircraft to the selected airport and runway, creating a more active environment for circuit awareness, radio work and spacing decisions.
Add up to ten supported Cessna 172 and Cirrus SR22 aircraft, when their corresponding models are installed in X-Plane. Configure circuit direction and distance, altitude, circuit and approach speeds, final-approach length and landing behaviour. Start traffic at a holding point, on the runway or on an airborne circuit leg, and stagger multiple aircraft with a selectable injection interval.
Choose pilot position calls for a traffic-advisory scenario or select a tower-controlled circuit. In instructor-controlled Tower mode, issue line-up, takeoff and approach clearances from the traffic cards. Automated Tower can manage the exchanges when the student’s workload is the focus.
Scripted following-speed and flap protection support orderly training traffic, while unsafe approach spacing can trigger a go-around. The instructor remains responsible for supervising the complete scenario.
SIDEBAR AND WORKSPACE CUSTOMISATION
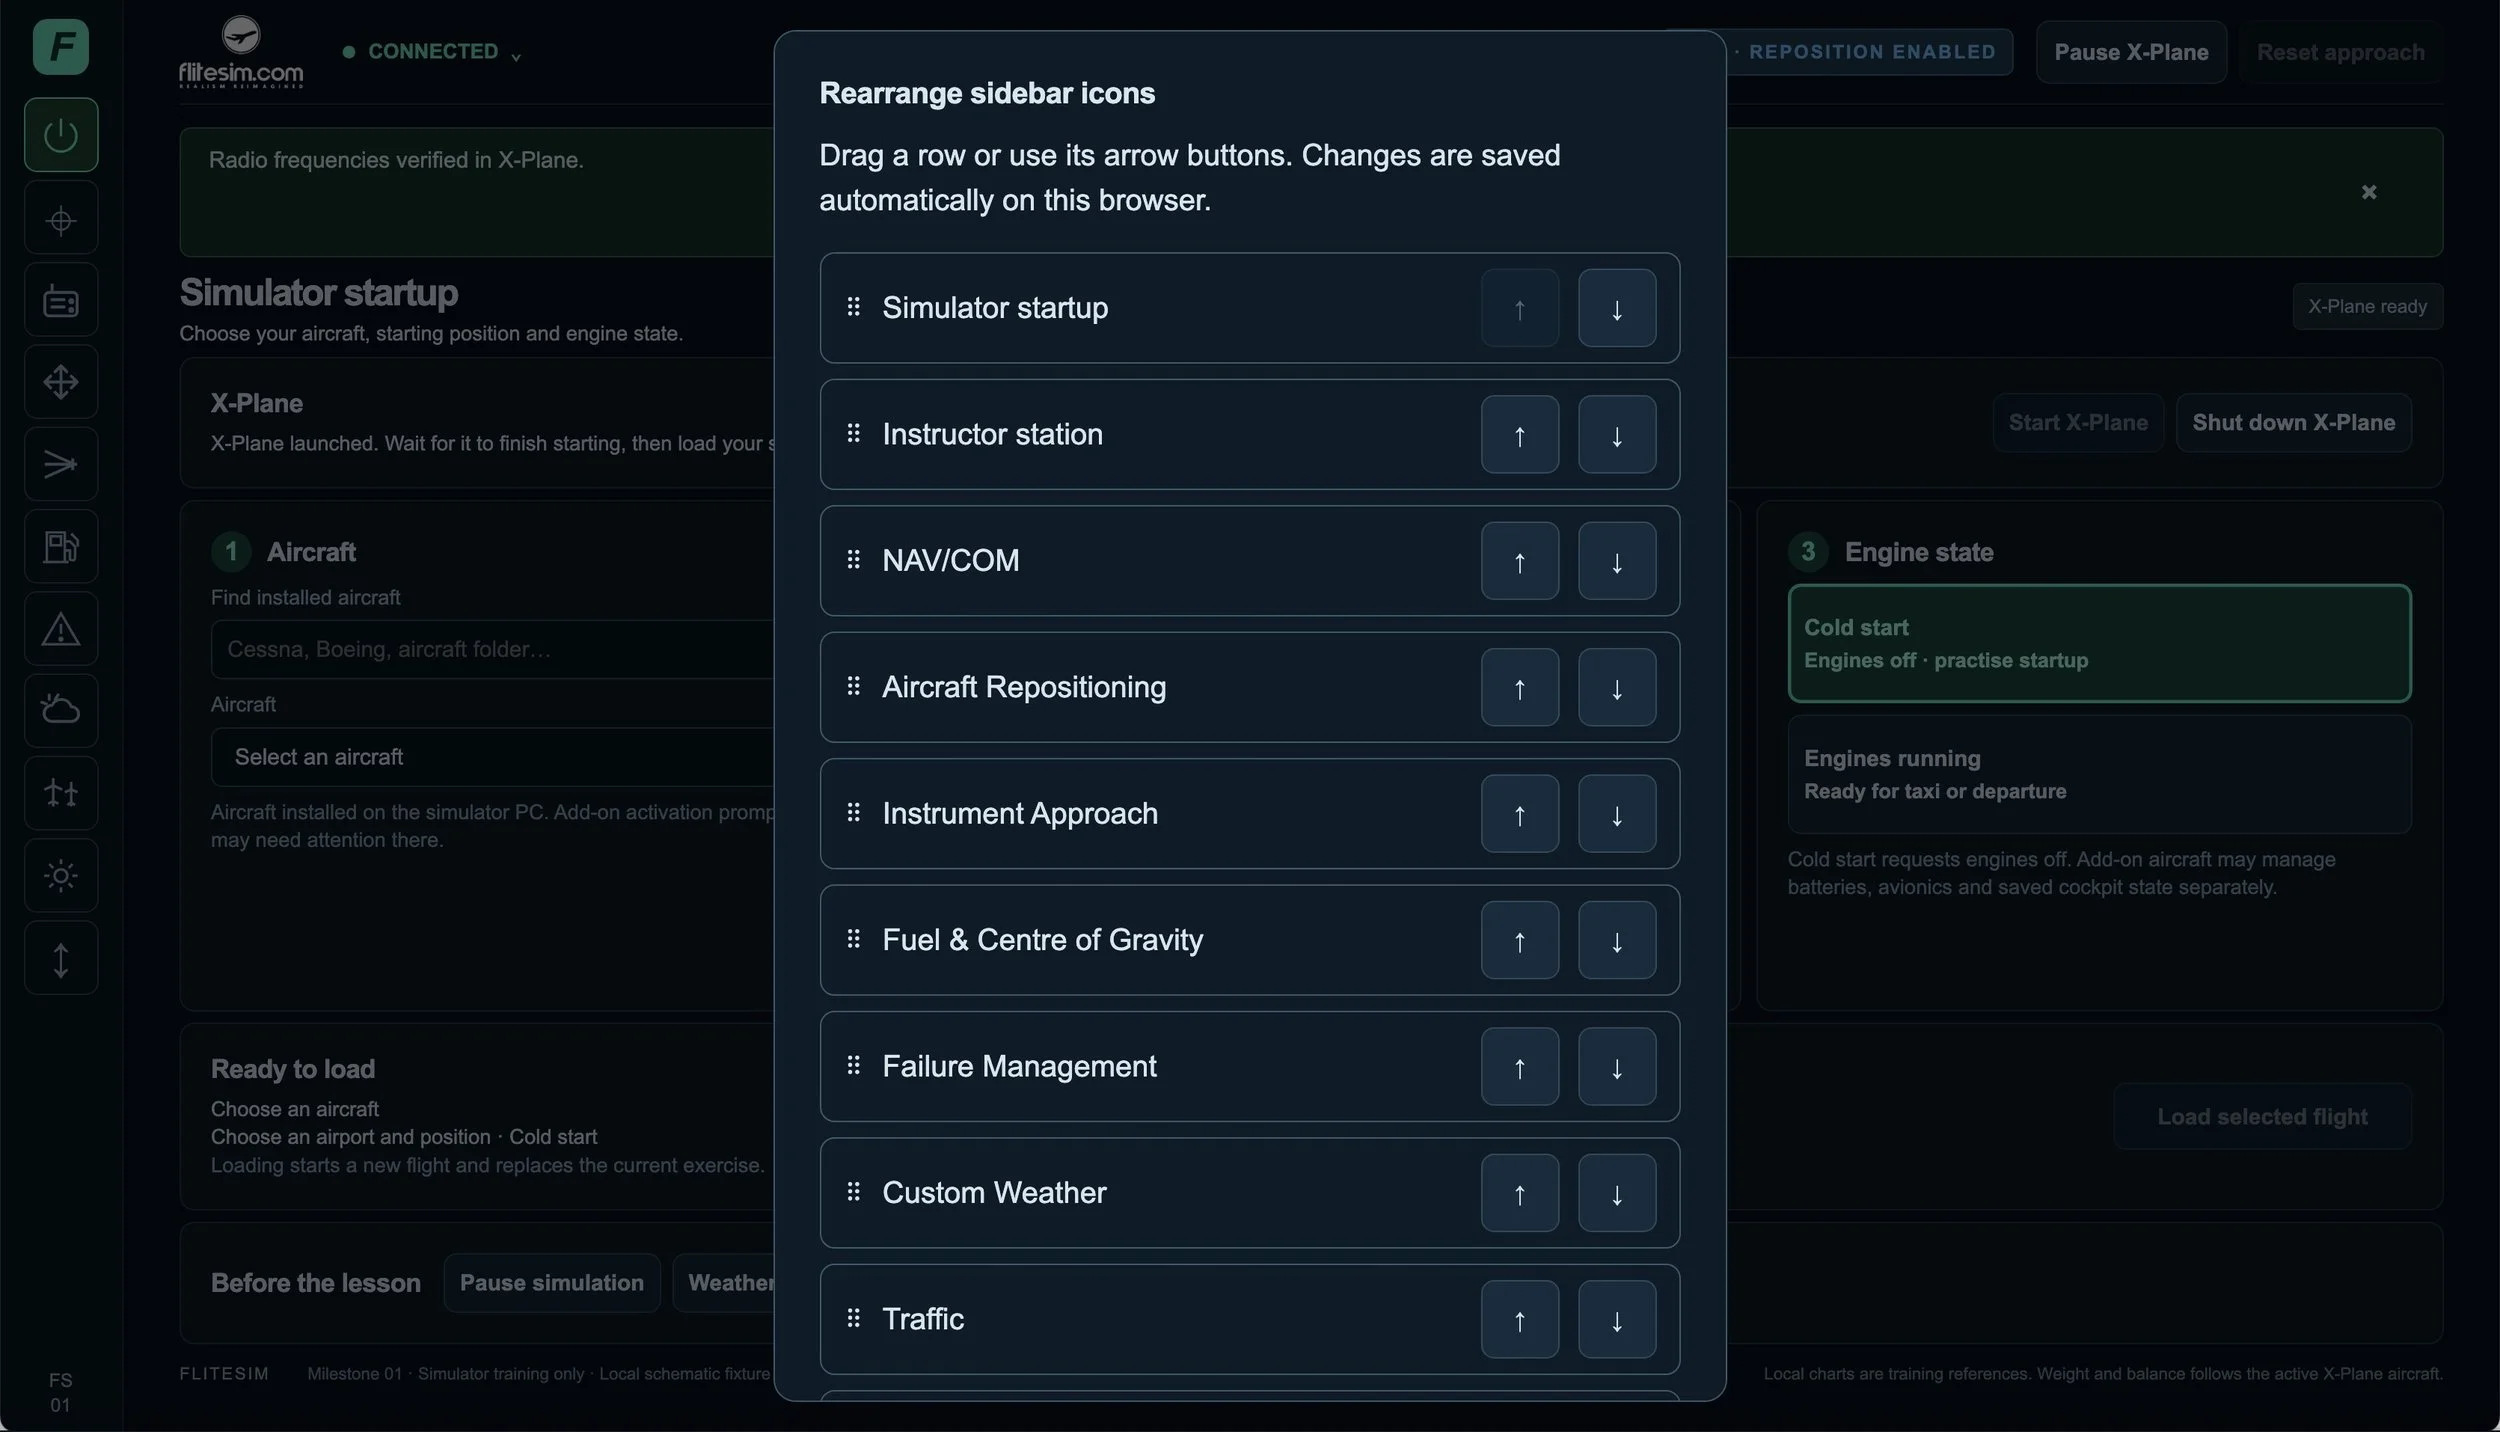
Every main workspace is one tap away in the left-hand sidebar. Hover over an icon to see its name, select it to change workspaces and use the reorder control to place the functions in the sequence that best suits your lessons.
The chosen sidebar order is saved automatically in that browser. The main dashboard can be arranged independently, with movable panels and reusable named layouts.
This gives each instructor a consistent workspace without forcing every lesson into the same screen arrangement.
Simulator Startup and NAV/COM have their own sidebar icons. Weather, failures, loading, traffic and settings use compact controls, tabs or selectors to keep the current task in view.
PRACTICAL BENEFITS
Saved positions, weather, traffic and layouts reduce repeated setup.
Return students to the same runway, speed, altitude and conditions.
See instruments, controls, position, approach path and status together.
Pause and use track and profile displays while the event is still fresh.
Change weather, loading, failures and traffic as workload develops.
Use replay or a local station recording to revisit key moments.
HOW IT FITS INTO THE SIMULATOR
Instructor Station runs on the Windows simulator PC with X-Plane 12 and the FliteSimTelemetry plugin. Use the browser on that PC, or pair a phone, tablet or laptop on the same trusted Wi-Fi network. Persistent pairing and an explicit Take control handover keep command authority clear.
Available aircraft, weather, failure and radio controls depend on the capabilities exposed by the installed aircraft and matching plugin version. Airport, navigation, terrain and surface detail come from the X-Plane installation and its scenery data.
FIRST-YEAR COMMERCIAL LICENCE INCLUDED
See how Instructor Station can support private-pilot exercises, instrument procedures, emergency scenarios, circuit training and instructor-led simulator sessions.
FREQUENTLY ASKED QUESTIONS
A Windows simulator PC with X-Plane 12, the local Instructor Station service and the FliteSimTelemetry X-Plane plugin. The interface opens in a compatible browser. Flight setup through Simulator Startup requires the supported X-Plane API and its incoming-network setting.
Yes. Connect your phone, tablet or laptop to the same trusted Wi-Fi network as the simulator PC. Open the local access URL shown in Admin Settings, enter the six-digit pairing code and give your device a name. Select Take control when you want to issue commands. No app-store installation is required. Where supported, the optional Install App button opens this same interface as a browser-based app; the simulator PC and local station service still need to be running.
Yes. Multiple paired devices can monitor the session, with one active controller at a time. Select Take control on the device you want to operate and manage paired devices from the host dashboard.
No. This website provides customer accounts and software downloads. To monitor or control X-Plane, open the local address displayed by Instructor Station on your simulator PC. Wi-Fi access stays on your trusted private network; no router port forwarding is required.
Available controls depend on the systems and writable values exposed by the selected X-Plane aircraft. Instructor Station disables unavailable functions rather than implying that a command has been applied.
No. Instructor Station focuses on preparing, controlling and observing the live lesson. Its local recording and replay controls complement FliteSim Flight Recorder’s broader debriefing, scoring and flight-report functions.
No. They are simulator-training references built from the installed X-Plane environment and must not be used for real-world flight planning or navigation.